Why Block Geometry Defines Border Performance
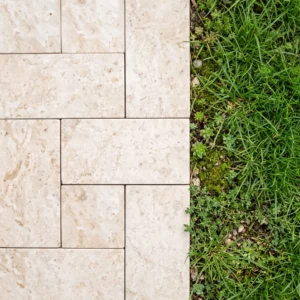
Limestone landscape blocks for borders outperform poured concrete edging and pressure-treated timber in one specific way that most landscape architects undervalue — their geometry stays locked under differential settlement. A 6-inch by 12-inch block with a nominal 4-inch height maintains its lateral restraint even when the adjacent soil shifts 15 to 20 millimeters seasonally. That’s the threshold where timber edging begins to lean and concrete curbing cracks at the control joints. The block mass anchors itself through friction and weight, not through fasteners or adhesive bonds that degrade over time.
Your border’s structural integrity traces directly back to block dimensions and how consistently they’re stacked. Dimensional tolerance in natural limestone runs tighter than most buyers expect — quarried units from a reputable source hold ±3mm face variance — but you still need to account for that variation in your coursing plan. Stacking two courses without a leveling course correction is where most DIY borders develop visible tilt within two seasons.
Base Preparation That Actually Holds
Here’s what most specifiers miss when they plan limestone block edging — the base depth recommendation printed on generic installation guides assumes a well-drained sandy loam. In clay-heavy or organically rich soils, you need to go deeper. A minimum 4-inch compacted aggregate base (3/4-inch clean crushed stone) is the starting point. In expansive clay zones, push that to 6 inches and add a geotextile separation layer between the native soil and the aggregate to prevent fines migration over time.
Your compaction effort matters as much as your base depth. Tamp in two lifts, not one. A single 6-inch lift compacted all at once retains air pockets at the mid-point that later consolidate under the block weight — that’s what produces the 2-inch settlement you see at border corners after the first winter. Two 3-inch lifts, compacted to 95% Proctor density, gives you a stable platform that holds course alignment for 15 years or more without re-leveling.
- Minimum base depth: 4 inches compacted aggregate in free-draining soils
- Expansive clay soils: 6 inches with geotextile separation fabric
- Compaction: two lifts, each tamped separately before proceeding
- Setting bed: 1-inch screeded sand or stone dust on top of aggregate base
- First block course: set flush with finished grade or 1 inch above for surface drainage direction
Choosing the Right Application for Your Border Design
Landscape limestone blocks serve three fundamentally different border functions, and the right choice depends on the load and height your design requires. Single-course edging — one block laid on its flat face — works for flower bed separation and lawn borders up to 4 inches in height. Double-stacked coursing handles raised bed walls up to 16 inches without mortar, relying on block-to-block friction and batter (a slight backward lean of 1 inch per course) for stability. Anything above 24 inches starts entering retaining wall engineering territory and requires a professional structural review regardless of material.
For raised vegetable beds, limestone landscape blocks for borders at 12 to 16 inches high give you the soil volume that root vegetables need — most gardeners underestimate how much height translates to productive growing depth. At that range, you’re stacking three to four courses of standard 4-inch-high blocks. According to Natural Stone Institute limestone specifications, natural limestone in the sedimentary density range (typically 150 to 168 pounds per cubic foot) provides the mass-to-friction ratio that keeps dry-stacked borders stable under soil pressure without mortar.
UV Exposure and Long-Term Surface Appearance
Sun-exposed limestone block edging undergoes a weathering process that experienced installers either work with or fight against — and the choice affects your maintenance schedule significantly. UV radiation doesn’t degrade limestone’s structural integrity the way it degrades polymer materials, but it does drive two visible surface changes: carbonate surface oxidation (the gradual bleaching of golden or cream tones toward a lighter, chalky finish) and differential color fading across shaded versus exposed faces of the same border.
Your finish selection directly influences how pronounced this UV response becomes. A honed or sawn face shows color shift more noticeably than a bush-hammered or tumbled finish because the flatter surface reflects light uniformly — any tonal change reads as a solid field shift. Textured finishes scatter light, which visually masks the gradual bleach effect. For borders in full-sun garden settings, a tumbled or rough-split face holds its visual character longer than a smooth-sawn product. USGS limestone composition data confirms that calcite-dominant limestone in the 90%+ purity range is most susceptible to surface carbonate bleaching under prolonged UV exposure — which is the material range that also delivers the warm cream tones most designers specify.
- Honed and sawn faces: show UV-driven color shift most visibly — plan sealer reapplication every 2 to 3 years
- Tumbled and rough-split faces: scatter light effectively, masking gradual tonal shift for 4 to 5 years between sealer cycles
- Penetrating silane or siloxane sealers: appropriate for exterior block borders — avoid film-forming sealers that trap moisture
- Sealing newly installed limestone: wait 28 days after installation to allow moisture equilibration before first sealer application
- North-facing versus south-facing faces of the same border will weather at different rates — anticipate visual asymmetry in 5 to 8 years without sealing
Ordering, Quantity Planning, and Lead Times
Calculating your limestone landscape blocks accurately before ordering prevents the two most common project failures — running short mid-installation and over-ordering material you can’t return. For a single-course border, your linear footage directly converts to block count using the block face length. A 12-inch-face block on a 100-linear-foot border requires a minimum of 100 units plus 10% overage for cuts and breakage. For double-stacked raised beds, multiply by the number of courses and add 15% — cuts increase at corners, and limestone is a natural material with a small percentage of units that don’t make the cut for visible faces.
Citadel Stone cuts every order at its selected quarries, and the lead time for your specification is quoted with the order. For large raised bed installations — anything over 500 linear feet of border — verify warehouse stock levels before finalizing your project timeline. Truck delivery scheduling for palletized stone requires confirmed access width (minimum 10 feet clear) and a stable unloading surface. A standard pallet of limestone blocks weighs 2,000 to 2,500 pounds, so your delivery area needs to handle that point load without a forklift pad failure.
For projects that combine border edging with vertical landscape features, Citadel Stone stacked limestone blocks offer the dimensional consistency that keeps multi-course installation efficient and visually cohesive across the full project scope.
Dry-Stack Versus Mortar-Set: The Real Performance Trade-Off
The debate between dry-stack and mortar-set limestone block edging comes down to one practical question — how much seasonal ground movement does your soil experience? In stable, free-draining soils with minimal frost depth, mortar-set borders deliver a cleaner finish line and resist the individual block displacement that dry-stacked borders can develop over time. In soils with moderate freeze-thaw cycles or any significant clay content, mortar creates a rigid system that the ground movement will eventually crack. Dry-stack actually performs better in those conditions because each block can micro-adjust without transferring stress to adjacent units.
Mortar mix for limestone block borders should never be a standard S-type mix. Use a Type N mortar (1 part Portland, 1 part lime, 6 parts sand) for limestone — the lime component keeps the mix slightly flexible and prevents the joint from becoming harder than the stone itself. A joint harder than the stone face will cause spalling at the block edge as the system moves. This is the specification failure that landscape contractors encounter most often when they hire a masonry crew unfamiliar with natural stone behavior.
- Dry-stack: preferred in freeze-thaw regions, clay soils, and sites with known differential settlement
- Mortar-set: appropriate in stable, free-draining soils — use Type N mix only
- Batter angle for dry-stack raised beds: 1 inch setback per course (roughly 5 to 7 degrees)
- Maximum dry-stack height without engineering review: 24 inches above finished grade
- Capstone course: set in mortar regardless of dry-stack body — prevents water infiltration into the top joint
Managing Soil Drainage and Retaining Pressure
The structural demand on landscape limestone blocks increases sharply when they’re retaining saturated soil. Water-logged fill behind a border exerts hydrostatic pressure that multiplies the effective lateral load by 30 to 50 percent compared to dry soil at the same depth. That’s the calculation most decorative edging specs overlook entirely — they account for soil weight but ignore pore water pressure. For any raised bed or retained border above 8 inches, your drainage plan is as important as your block selection.
Drainage gravel directly behind the block face — a 4 to 6 inch wide column of 3/8-inch pea gravel or clean crushed aggregate — provides the pressure relief that keeps borders upright for decades. The ASLA landscape edging and border stone design guidance specifically addresses permeable backfill as a fundamental component of durable stone border systems. Drain tile at the base of the aggregate column, daylighted at grade on the downhill end — that’s the detail that separates borders that last 20 years from ones that lean and fail in 5.
What Matters Most for Limestone Landscape Blocks
The decisions that define a limestone landscape block border’s long-term performance are almost all made before the first block is set — base depth, drainage geometry, block finish selection for your sun exposure conditions, and dry-stack versus mortar-set based on your soil type. Getting those foundational details right means your border holds its alignment and appearance for 20 years with minimal intervention. Getting them wrong means a re-installation project within a decade, regardless of how well the blocks themselves were laid.
Your sealing schedule, block coursing plan, and drainage gravel specification should all be documented before materials arrive on site. At Citadel Stone, our technical team advises confirming all three of those specifications in writing before your truck delivers the first pallet — it’s the single most effective way to prevent mid-project scope changes that add cost and delay. For more on how limestone block products begin their life before reaching your project, how limestone edging is quarried covers the quarrying process from bed to border in practical detail. Proper drainage gaps between stacked Citadel Stone limestone units prevent hydrostatic pressure buildup, which is the leading cause of retaining border failure in clay-heavy soils.
Related reading: sandstone stepping stones · bullnose edging stones · Curved Limestone Edging Ideas for Beds & Lawn Borders.