

Light travertine floor design ideas look deceptively simple on mood boards, but the installations that actually hold up — and hold their visual appeal for decades — come down to specific decisions most guides gloss over. The way light travertine interacts with ambient illumination changes throughout the day, and that shift either amplifies your design intent or exposes inconsistencies in your material and finish selection. Understanding that dynamic from the start separates a floor that photographs well from one that genuinely lives well.
Why Light Travertine Works Indoors and Out
The visual range of light travertine — from creamy ivory to soft walnut-veined beige — gives it a flexibility that denser igneous stones simply don’t offer. Its natural vein movement and fill patterns break up large floor planes without competing with furniture or cabinetry. That neutral base also means it reads differently under warm incandescent light versus cooler daylight, which is something worth factoring into your finish selection before you commit.
For outdoor applications, light travertine’s open-pore structure plays a thermal role that goes beyond aesthetics. According to Natural Stone Institute travertine properties and outdoor suitability, travertine’s characteristic porosity and calcium carbonate composition actively moderate surface heat compared to denser alternatives — a meaningful advantage for barefoot-friendly spaces. Match your finish to the exposure: honed for interior floors, brushed or tumbled for exterior surfaces where slip resistance matters.
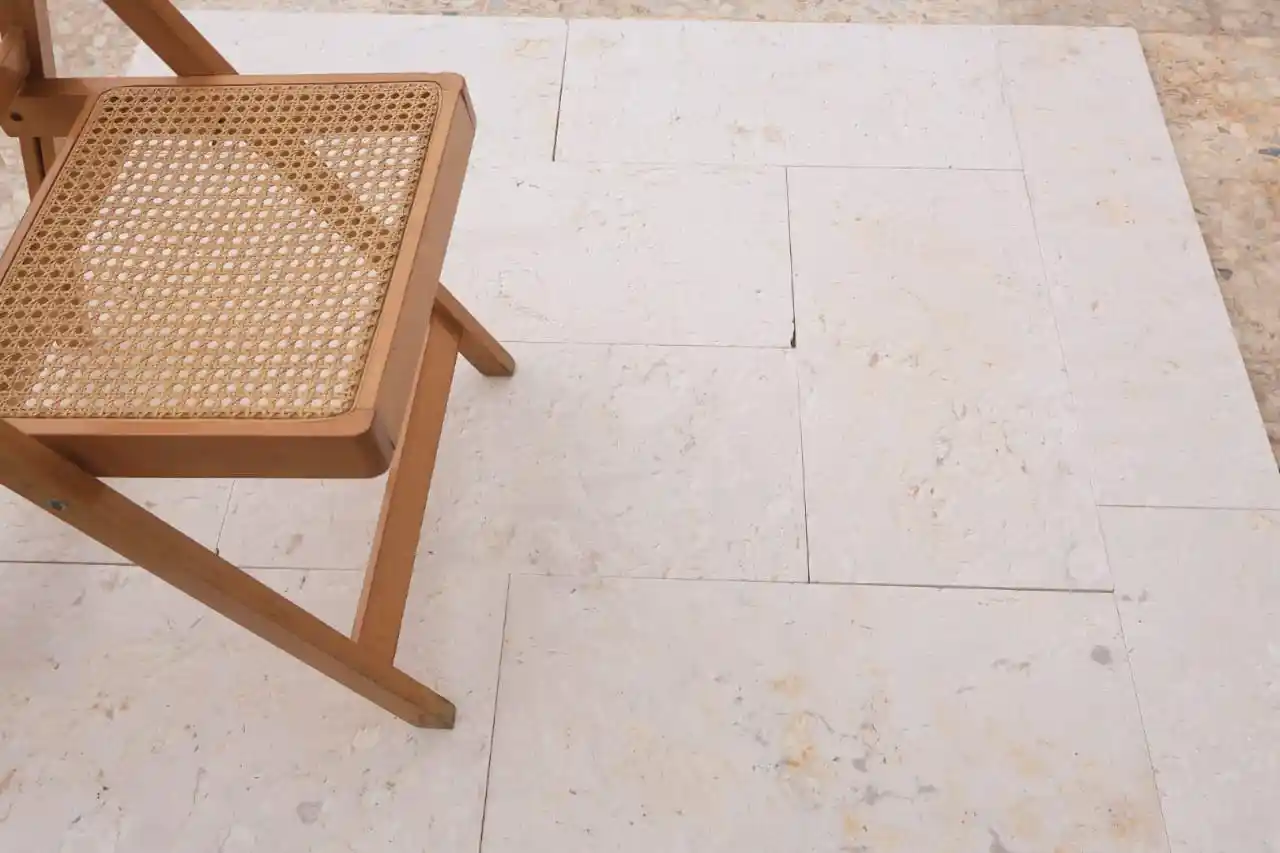
Classic Light Travertine Floor Design Ideas
The light travertine floor design ideas that consistently perform across residential and commercial projects share one characteristic: they work with the stone’s natural variation rather than against it. Here are the approaches worth building around.
- Large-format tiles in 18×18 or 24×24 inch cuts reduce the number of grout lines, letting the stone’s natural veining carry the visual weight across open floor plans
- Running bond layouts in rectangular formats (12×24 or 16×24) create a horizontal rhythm that visually widens narrow corridors and bathrooms
- Versailles pattern installations mix four tile sizes to mimic the randomness of reclaimed stone — a look that suits transitional and Mediterranean-influenced interiors equally well
- Diagonal grid layouts at 45 degrees expand perceived room size more than any other single layout decision, particularly effective in square rooms under 200 square feet
- Offset stacking with a consistent 1/3 offset rather than the standard 1/2 offset reduces lippage risk across larger format tiles, which matters on floors with minor substrate variation
White Travertine Tile Floor and White Wall Pairings
Pairing a white travertine tile floor with white walls is one of those combinations that sounds like it should flatten a room but consistently does the opposite when executed with tonal awareness. The key is contrast between the floor and wall finishes — a matte wall against a honed floor, or a textured plaster wall against a filled-and-polished travertine surface.
Grout selection becomes the most consequential detail in this combination. White walls with travertine floors benefit from a warm-toned grout that echoes the stone’s natural fill color rather than a stark bright white that reads as a grid overlay. Unsanded grout in joints under 1/8 inch keeps the floor surface reading as continuous stone rather than a tiled assembly. The ASTM C1527 travertine dimension stone standard specifies dimensional tolerances that directly affect how tight you can realistically hold those joints — worth checking against your material before finalizing the grout spec.
- Match grout tone to the mid-range of the travertine’s vein color — not the lightest or darkest point
- Use epoxy grout in high-moisture areas to prevent the discoloration that stains pale grout lines in kitchens and bathrooms
- A filled and honed travertine surface maintains the seamless look better over time than unfilled, which collects cleaning residue in open voids
Travertine and White Bathroom Design
The travertine and white bathroom combination is one of the most enduring design formulas in residential stone work, and for practical reasons beyond aesthetics. Light travertine’s warm undertones prevent the clinical coldness that pure white ceramic creates, while its natural variation means surface wear and minor etching blend into the material’s character rather than showing as damage.
Bathroom floor specifications need to prioritize the COF (coefficient of friction) rating. A honed travertine can read beautifully dry but becomes genuinely hazardous wet without a slip-resistance treatment or textured finish. Brushed travertine hits the sweet spot for wet bathroom floors — it retains the refined look of the material while providing enough surface texture to meet practical safety requirements. For shower floors specifically, smaller mosaic formats (2×2 or 1×1 inch) increase the number of grout lines, which function as grip lines on wet surfaces.
- Seal bathroom travertine floors with a penetrating impregnator sealer before grouting — not after — to prevent grout staining the stone’s open pores during installation
- Reapply sealer every 18 to 24 months in wet areas; annual resealing in shower floors is not excessive
- Coordinate floor travertine with any wall field tile by selecting pieces from the same quarry run to maintain consistent vein tone and color temperature
Coordinating Finishes Across Open Floor Plans
One of the trickier light travertine floor design ideas to execute is continuous flooring across multiple rooms with different light conditions. A living area may receive strong afternoon sun from west-facing windows while a kitchen sits under cooler overhead LED fixtures — and the same travertine tile reads as two different materials in those conditions if you haven’t field-tested samples under both light sources.
Explore the depth of available material options before specifying — Citadel Stone light travertine selections give you a range of tone, fill, and finish combinations that make coordinating across zones significantly easier. At Citadel Stone, we review material from the same quarry batch when projects require consistent tone across large floor areas, which is something worth discussing before your warehouse order is placed.
- Order 10 to 15 percent overage on continuous floor projects to account for cuts, lippage rejection, and future replacement matching
- Request samples from the specific lot or batch that will ship — color consistency varies between production runs even within the same grade
- Verify warehouse stock levels for your full square footage requirement before confirming your installation schedule
Installation Timing and Seasonal Considerations
Scheduling a light travertine floor installation around seasonal conditions isn’t optional — it directly affects adhesive performance and the dimensional stability of your finished floor. Modified thinset mortars have a working temperature window, typically between 50°F and 90°F, and both extremes create problems. In colder months, adhesive cure time extends significantly, which means tile can shift under foot traffic before the bond achieves full strength. In peak summer conditions, the opposite risk emerges: rapid surface evaporation can skin over the thinset before adequate contact is achieved.
Morning installation windows — from roughly 7 a.m. to early afternoon — tend to produce the most consistent results during warmer periods. Surface temperatures on concrete substrates can climb 15 to 20 degrees ahead of ambient air temperature in direct sun, which affects both the adhesive and the dimensional behavior of the travertine itself. For large-format tiles over 18 inches, back-buttering every piece becomes mandatory rather than optional when surface temperatures are above 75°F, because partial contact from rapid adhesive skinning is the leading cause of hollow spots that only reveal themselves months after installation. According to the Tile Council of North America installation standards, full mortar contact should exceed 80% of tile coverage in dry areas and 95% in wet areas — thresholds that become harder to meet as temperatures push higher.
Base Preparation and Substrate Requirements
The substrate is more consequential than the tile placed on top of it. Light travertine, with its characteristic open-pore structure, telegraphs substrate movement more visibly than denser stones — micro-cracks at grout joints almost always trace back to substrate flex, not the tile itself. Deflection in the subfloor assembly should not exceed L/360 under live load for travertine installations; L/720 is the target for large-format tiles above 15 inches on any edge.
- Test substrate moisture levels with a calcium chloride test — travertine installations over concrete slabs should not proceed above 5 lbs per 1,000 square feet per 24 hours
- Use an uncoupling membrane over wood subfloors to isolate seasonal expansion and contraction from the stone layer
- Check substrate flatness: no more than 1/8 inch variation over a 10-foot span, or 1/16 inch over a 2-foot span, for filled travertine in a honed finish
- Control joints in the substrate must be honored through the tile work — never bridge them
Sealing and Long-Term Maintenance
Light travertine requires a sealing protocol that accounts for both its porosity and its calcium carbonate chemistry. Penetrating impregnator sealers — silane or siloxane-based formulations — protect the stone’s interior without altering its surface appearance, which is the correct approach for filled and honed floors. Topical coatings create a surface film that wears unevenly and traps cleaning residue in the travertine’s texture, creating maintenance cycles that escalate over time.
The practical maintenance schedule for interior light travertine floors is biennial resealing in moderate-use residential areas and annual resealing in kitchens and bathrooms. USGS geological data on limestone and travertine mineral formation confirms that travertine’s calcium carbonate structure makes it reactive to acid — even mild acids like those in citrus cleaners or vinegar will etch a polished or honed surface. Cleaning protocols should use pH-neutral stone cleaners exclusively.
- Test sealer penetration by placing a few drops of water on the surface after application — beading indicates adequate coverage, absorption indicates the surface needs another coat
- Dry-mop daily and wet-mop weekly with a diluted pH-neutral cleaner to prevent grit from acting as an abrasive on the honed surface
- Address any fill voids that open over time with color-matched grout or epoxy fill — open voids collect debris and compromise the floor’s visual consistency
Decision Points
The light travertine floor design ideas that hold up over the long term share a common foundation: decisions made at the specification stage rather than improvised during installation. Format, fill type, finish, and grout color collectively determine the floor’s visual tone; substrate preparation and installation timing determine its structural performance. Treat both as equally weighted priorities rather than sequential concerns.
As you refine your pattern and layout approach, the broader conversation around travertine layout geometry is worth exploring — travertine tile pattern options and layouts covers the full range of pattern configurations that influence how any travertine floor reads at scale. Citadel Stone’s team can review your project requirements and confirm material availability from current warehouse stock before you finalize your schedule. Citadel Stone’s white travertine backsplash tiles pair naturally with light-toned cabinetry, extending the stone’s warmth across kitchen surfaces.
Related reading: pool coping types · porcelain pool coping · pool waterline tile.