The Grid That Hides Nothing
Every other layout in the library breaks its joints on purpose – to absorb error, to interlock, to soften. Stack bond does the opposite: it aligns everything, in both directions, and lets the joints run as unbroken rules across the whole surface. The result is the most architectural floor a paver can make, the natural partner of flat roofs, steel glazing lines and minimalist planting. It is chosen by people who want the geometry visible – and it repays them exactly as long as the geometry is true.
What the Pattern Demands
Stack bond is less a laying pattern than a tolerance specification:
- Calibrated stone – units that measure identical, not roughly similar
- Sawn, crisp edges, so joints stay parallel-sided down their whole run
- A dead-flat screed, since aligned joints telegraph every hollow
- Reference lines – string or laser – maintained for the entire job, not just the start
None of this is exotic; all of it is non-negotiable. The pattern costs no more stone than any straight lay – what it costs is discipline, and it invoices that cost in public if the discipline is skipped.
Formats That Carry the Grid
The grid reads differently depending on what fills it:
- Large squares – 24 x 24 inches (600 x 600 mm) and up – the classic contemporary field
- Rectangles stacked long-side across, which stretch a courtyard visually
- Rectangles stacked vertically, which give walls of glass a floor that answers them
- Narrow plank formats, where the grid becomes fine lineation
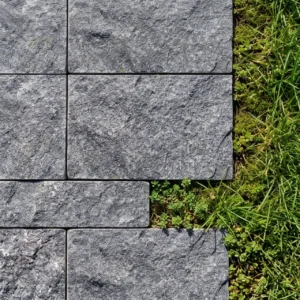
Dense, even-toned material serves the aesthetic best: calibrated basalt tiles in charcoal tones turn the joints into drawn lines on a calm ground, which is most of what the modern grid is after.
Alignment Is the Whole Craft
Where offset layouts square themselves to a sightline and absorb the rest, stack bond must agree with the architecture around it – because its lines will be read against door frames, glazing mullions and wall edges all day long. The working method is unglamorous: set the two master lines off the building’s dominant elevation, check the first nine units against both, and then never stop checking. A laser line pays for itself the first time it disagrees with a confident guess. The grid is not difficult; it is merely honest, and honesty takes attention.
Joints as the Design Surface
In this layout the joints are not the gaps between the design – they are the design. Their width, their fill and their consistency decide whether the floor reads precise or merely rigid. A charcoal joint in a pale field draws the grid boldly; a tone-matched joint lets the stone dominate and the grid whisper. Whichever register is chosen, the fill must sit slightly below the arris so the lines shadow cleanly, and the width must hold to the millimeter – no layout leans on the joint gauge harder than this one.
Where Stack Bond Belongs – and Where It Does Not
The pattern has a clear jurisdiction:
- Contemporary courtyards and terraces, where the architecture already speaks in grids
- Indoor floors that continue through the glass line, answering the glazing rhythm
- Roof terraces and balconies, where calibrated units on pedestals are already the system
- Pool surrounds in minimalist schemes, grid meeting waterline cleanly
Where it does not belong is under wheels: continuous joints hand braking loads an unbroken seam to work against, so driveways and turning courts go to stronger layouts, with the forgiving default or a woven set doing the load-bearing while stack bond keeps to the showpieces.
The Failures That Show From the Street
Stack bond fails in four photogenic ways, all preventable at the start:
- The drifted line – one master line set casually, then obeyed faithfully into visible error
- Mixed calibration – two production runs in one field, their half-millimeter difference accumulating down every joint
- The hollow screed – a soft spot that settles one unit, breaking three continuous lines at once
- Joint wander – width varying course to course, turning the drawn grid into a sketch
Notice what is absent from the list: the stone itself. Stack bond almost never fails as material – it fails as measurement, which is the encouraging version of demanding, because measurement is free and re-laying is not. Every failure above is caught by the checking rhythm the pattern asks for and punished by the shortcut around it.
The Tolerance Budget, Inverted
Most layouts hide small imperfections; stack bond exhibits them. That inversion should steer the whole project: buy the calibrated grade rather than the bargain pallet, brief the installer on the checking rhythm before price, and treat the screed as half the job rather than the boring part. Buyers who respect the inversion get the sharpest floor in the catalog; buyers who treat it as just another straight lay learn why the offset patterns were invented in the first place.
Ordering for a Grid
Mark the master line on your drawing – the elevation the grid answers to – and the quote returns with calibrated formats, a single verified thickness, and the modest five percent margin the straight edges allow. Browse the finish library for grid-friendly textures to choose the surface, honed and sawn faces being the grid’s natural companions. Stack bond is not a harder pattern so much as an honest one – and honesty is a specification: calibrated stone, held lines, a screed treated as half the job.
The Grid Is Cheap to Cut and Expensive to Get Wrong
Stack bond wastes very little stone. Every cut sits at the perimeter, every closer is a straight cut, and the grid itself generates no waste at all. What it costs instead is tolerance: with all four joints aligned, a two-millimeter variation in unit size becomes a visible kink by the tenth course.
| Pattern | Straight edges | Curved or angled edges | What drives the number |
|---|---|---|---|
| Stack bond | 5% | 8% | full-unit grid, cuts confined to the perimeter |
| Running bond, laid parallel to the edge | 5% | 8% | half-unit closers only, all at the perimeter |
| Basketweave | 5% | 8% | square modules land clean on a set-out grid |
| Border or soldier course | add 5% on the run | add 8% | mitered corners and short closers |
The reason is structural rather than aesthetic: stack bond is purely a pattern bond with no overlapping of units, which is why the technical note on bonds and patterns insists on dimensionally accurate units for it.
Setting Out a Grid That Stays True
Every stack bond failure is a setting-out failure. The pattern has no forgiveness built into it, so the forgiveness has to be built into the process instead.
- Sort and gauge the units before laying, not during
- Set out from two perpendicular strings and check the diagonal, not just the edges
- Fix the joint width with spacers rather than by eye
- Dry-lay the first two bays and measure before anything is bedded
- Reject units outside tolerance instead of absorbing them into the joint
- Run the grid parallel to the dominant sightline, usually the building face
- Decide where a part unit is allowed to land before laying, not after
Because the grid puts no interlock into the field, keep it away from turning vehicles; the thickness and application bands are set out in the interlocking concrete pavement application guide.
Stack bond paver pattern, only as good as the setting out
Specify it where the grid is the point, and be honest about what it demands from the material and the crew.
- Contemporary terraces, courtyards and pool surrounds on foot traffic
- Calibrated units with a tight dimensional tolerance
- A crew that will gauge and dry-lay rather than improvise
- A border or level change to end the grid cleanly
If the site sees vehicles, the comparison table in our paver laying pattern library shows what to use instead.
Stack bond shows every millimeter you allow it, which is exactly why it looks expensive when it is right.