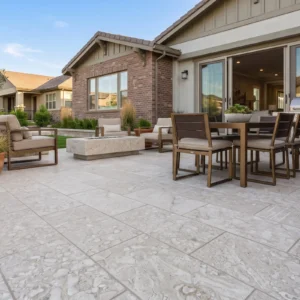
Limestone paver base preparation is where long-term performance is either secured or surrendered — and the margin between a 10-year installation and a 25-year one typically comes down to decisions made before a single paver is set. Most specifiers focus on the stone itself: finish, thickness, color consistency. The base work gets treated as a formality. That’s the mistake. Getting the sub-base geometry, compaction sequence, and drainage gradient right from the start is what determines whether your joints stay tight and your surface stays level for the life of the project.
Why Base Depth Directly Affects Limestone Paver Longevity
The load a limestone paver experiences isn’t distributed evenly across its face — it concentrates at contact points and transfers into the setting bed, then into the sub-base, and finally into the subgrade. Each layer has to absorb and redistribute that load without deflecting enough to crack the stone or shift the joint pattern. Your sub-base acts as the structural buffer in that chain, and its depth determines how much deflection the system can tolerate under dynamic load.
For pedestrian applications — patios, walkways, residential pool surrounds — a compacted aggregate base of 4 to 6 inches is the standard starting point. Vehicle-rated applications require significantly more: 8 to 12 inches of compacted crushed stone is the practical minimum for light passenger traffic, and heavier commercial applications push that figure higher. What often gets skipped in residential projects is the distinction between nominal depth and compacted depth. Loose aggregate compacts down roughly 20 to 25 percent under plate compaction, so a 6-inch compacted base requires approximately 7.5 to 8 inches of loose material before compaction begins.
- Pedestrian base: 4–6 inches compacted crushed stone (ASTM No. 57 or equivalent)
- Light vehicle access: 8–12 inches compacted aggregate, verified with a plate compactor
- Clay-heavy subgrade: add 4 inches minimum or install geotextile separation fabric before aggregate
- Freeze-thaw regions: extend base depth to match or exceed the local frost line depth — typically 24–36 inches in colder climates
- Slope: maintain a minimum 2% cross-fall gradient in the base layer for positive drainage
According to Natural Stone Institute limestone specifications, limestone’s relatively open pore structure makes it sensitive to sub-surface moisture retention — a well-drained base isn’t just a structural requirement, it’s a preservation requirement for the stone itself.
Subgrade Assessment: The Step Most Projects Rush
Your subgrade — the native soil beneath the aggregate base — determines everything above it. A well-constructed base sitting on an unstable subgrade will still fail. Before any aggregate goes down, you need to evaluate what you’re working with.
Probe the subgrade manually: a screwdriver pushed in with hand pressure more than 2 inches signals a soil that needs improvement before loading. Sandy loams and gravelly soils generally provide adequate bearing capacity for residential limestone paver base preparation. Clay soils are the problem case — they compress under load, retain moisture that causes seasonal expansion and contraction, and can undermine even a correctly specified base over time.
- Sandy or loamy subgrade: compact to 95% Proctor density before aggregate placement
- Clay subgrade: excavate an additional 4–6 inches, install geotextile fabric, then bring in imported granular fill before the primary aggregate base
- Organic material (topsoil, roots, debris): remove entirely — organic material compresses unpredictably under load
- Wet or saturated conditions: allow subgrade to dry before compaction, or address the moisture source upstream
The subgrade assessment step is also where building code requirements enter the picture. Jurisdictions with seismic activity have prescriptive base depth requirements for hardscape installations adjacent to structures — particularly for material that’s considered a tripping or displacement hazard under seismic loading. Checking your local jurisdiction’s requirements before excavation isn’t just due diligence; in some areas it’s a permit condition. Load-bearing requirements for hardscape near foundations, retaining walls, or utility corridors are increasingly specified in municipal codes, and the base design needs to account for those constraints before aggregate is ordered.
Aggregate Selection for the Limestone Paver Base Layer
Not all crushed stone performs equally as a base material, and the selection matters more than most residential projects acknowledge. The goal is angular, well-graded aggregate that interlocks under compaction and doesn’t shift laterally under load. Rounded river gravel fails this test — it behaves like ball bearings under a plate compactor and never achieves stable interlock.
ASTM No. 57 crushed stone (3/4-inch nominal) is the workhorse aggregate for limestone paver base preparation across most applications. It compacts predictably, drains well, and provides the interlocking structure needed for long-term stability. In areas where freeze-thaw cycling is a concern, the drainage properties of No. 57 stone become especially critical — saturated base material expands when frozen, and that expansion transmits directly to the paver surface as differential heave.
- ASTM No. 57 crushed stone: best for most pedestrian and light vehicle applications
- ASTM No. 21A (road base mix): higher fines content, better for driveway-grade vehicle loads but requires careful moisture management during compaction
- Recycled concrete aggregate: acceptable if well-graded and free of organic contamination — verify quality before specifying
- Pea gravel or rounded stone: not suitable for base layers — lacks interlocking structure
- Limestone screenings (stone dust pavers applications): used only in the setting bed layer, not the structural base
The distinction between the structural base and the setting bed layer is worth reinforcing here. The setting bed — typically 1 inch of compacted stone dust or coarse sand — sits directly below the pavers and provides fine leveling. It is not a substitute for a proper structural base. Thick setting beds (2 inches or more) compress unevenly under load and are one of the most common causes of surface deformation in the first two to three years after installation.
Compaction Sequence and Technique
Compaction isn’t a single pass with a plate compactor — it’s a sequenced process that builds density incrementally through the base profile. Dumping aggregate to full depth and running one compaction pass over the surface creates a dense top layer over a loose lower layer, and the base will settle unevenly over time.
The correct approach is lift compaction: place aggregate in 3- to 4-inch loose lifts and compact each lift to refusal before placing the next. “To refusal” means the plate compactor is no longer causing visible surface movement — the aggregate has reached its maximum compaction for that lift. A standard 5,000-pound plate compactor is adequate for residential pedestrian applications. Vehicle-rated bases benefit from a vibratory roller or a higher-capacity plate compactor (7,000 pounds or above) on the final two lifts.
- Lift thickness: 3–4 inches loose material per lift
- Overlap each compactor pass by 6 inches minimum for consistent density across the full width
- Make a minimum of 3 passes per lift — more if the surface is still moving on pass 3
- Final base surface: compact to a smooth, firm plane with no surface deflection under foot traffic
- Check grade and cross-fall after final compaction — drainage geometry changes as material settles during compaction
At Citadel Stone, we recommend specifying the compaction requirement numerically in project documents: 95% Standard Proctor density for pedestrian applications, 98% for vehicle-rated work. This gives installers a clear performance target and creates an accountability record if the base is later questioned during a warranty or defect dispute.
Edge Restraint: The Detail That Holds the System Together
A compacted base and a correctly set paver field can still fail at the perimeter if edge restraint is inadequate. Edge restraint prevents lateral migration of the pavers — without it, individual units creep outward under load, joints widen, and the installation begins to disaggregate from the edges inward.
For limestone paver installations, the edge restraint system needs to be specified based on application load. Plastic paver edging systems are sufficient for pedestrian-only applications provided the stakes are driven into undisturbed subgrade, not just compacted aggregate. Vehicle-rated edges require concrete curb restraint or steel edging pinned with 12-inch or longer spikes at 12-inch centers — the standard plastic systems do not provide adequate lateral resistance under vehicle tire loads.
- Pedestrian: polymer paver edging, 10-inch spikes at 18-inch centers, driven to undisturbed subgrade
- Vehicle-rated: steel edging with 12-inch spikes at 12-inch centers, or poured concrete haunching minimum 6 inches wide by 6 inches deep
- Adjacent to structures: structural connection required — do not rely on plastic edging where pavers terminate at a wall or step
- Code requirement note: some municipalities require edge restraint specifications to be included in permit drawings for hardscape projects over a certain area threshold — check local requirements early in your design process
For projects that include cobble sett units alongside flat limestone pavers, the edge restraint specification becomes even more critical given the varied loading geometry — review our cobble sett installation materials for base and restraint specifications that apply specifically to that format.
Stone Dust Setting Bed: Thickness, Placement, and What Not to Do
The setting bed is the final fine-grading layer between the compacted aggregate base and the paver undersurface. Specifying it correctly is the difference between a surface that stays level and one that develops high and low spots within the first season.
Stone dust — crushed limestone screenings or granite screenings — is the preferred setting bed material for stone dust pavers installations when a dry-lay system is used. It provides enough cohesion to hold grade during paver placement while still allowing minor adjustments before final compaction. Coarse washed concrete sand (ASTM C33) is an acceptable alternative, though it’s marginally less stable during the lay phase on sloped surfaces.
- Setting bed depth: 1 inch compacted — measure this precisely, not by feel
- Screed rails: use 1-inch diameter steel pipes as depth guides when screeding — pull them before paver placement and fill the channels
- Do not pre-wet the setting bed before paver placement — moisture reduces immediate stability and causes differential settlement
- Do not use bagged limestone dust that has been stored in damp conditions — clumped material won’t screed evenly
- Screed only as much setting bed as you can pave in one session — an exposed, traffic-walked setting bed loses its grade accuracy fast
The USGS limestone composition and formation data is useful context here: limestone screenings used in stone dust pavers applications share the same calcium carbonate base as the pavers above, which means differential thermal expansion between the setting bed and the paver face is minimal — a genuine advantage over sand beds in high-heat-cycling environments.
Drainage Geometry and Surface Slope
Standing water under a limestone paver installation is one of the most reliable ways to shorten its service life. Calcium carbonate is susceptible to carbonic acid attack when water sits against the stone surface or in the base for extended periods — the chemistry is slow but cumulative, and by the time it’s visible at the surface, the damage is already significant.
Your drainage design needs to work at two levels: surface drainage via the paver slope, and sub-surface drainage via the base layer. Both need to be addressed in the design phase — retrofitting drainage after installation is expensive and often incomplete.
- Surface slope: minimum 2% cross-fall (1/4 inch per foot) away from structures and toward defined drainage points
- Sub-surface drainage: ensure the base layer has a drainage outlet — either a perforated pipe at the base perimeter or a connection to an existing drainage system
- Adjacent to building foundations: slope away from the structure at minimum 2%, extending a full 10 feet from the foundation wall
- Permeable base option: for applications where surface runoff is a regulatory concern, a permeable aggregate base (ASTM No. 57 with no fines) allows infiltration through the joint system
- Low points: never design a low point within the paved area — always route drainage to the perimeter
Citadel Stone ships bagged limestone and base materials to projects across the country. Before your truck delivery is scheduled, confirm that your project site has clear access for a standard flatbed — unloading constraints at the delivery point can significantly affect your project timeline, and a rescheduled delivery when your crew is already on site is a costly delay.
Building Code Requirements and Base Specifications
Local building codes increasingly address hardscape base requirements, particularly for installations adjacent to structures, within drainage easements, or in jurisdictions with active seismic zones. The assumption that paver patios and walkways are permit-exempt is becoming less reliable as municipalities update their residential codes.
Frost line depth is the most commonly codified base variable. In freeze-thaw regions, prescriptive base depths tied to the local frost line are published in municipal building codes and referenced in the International Residential Code (IRC). Your aggregate base needs to either extend below the frost line or be designed as a flexible system that can accommodate freeze-thaw movement — the latter requires wider joint spacing and an edge restraint system robust enough to handle seasonal movement without permanent deformation.
- Check your jurisdiction’s frost line depth before finalizing base specifications — it’s published in local building department documents and the IRC climate tables
- Seismic design categories (SDC) A through F affect base compaction and edge restraint requirements in some jurisdictions — SDC D and above often trigger additional review
- Load-bearing proximity rules: some codes restrict non-structural hardscape within a specified distance of foundation walls without engineered base designs
- Stormwater compliance: jurisdictions with highly resistant surface limits may require permeable base designs for installations above a threshold square footage
The code compliance review is also the right time to verify that your limestone paver thickness meets any load-bearing minimums specified in local ordinances. Per limestone geological and structural characteristics, standard limestone paving thicknesses range from 3/4 inch (20mm) for light pedestrian use to 2 inches (50mm) or more for vehicle-rated applications — and some jurisdictions codify minimum thickness for material used in public-adjacent hardscape.
Ordering, Warehouse Logistics, and Project Timeline Planning
Limestone paver base preparation takes time — the compaction sequence alone typically requires 2 to 3 days for a medium-sized residential project once you account for lift intervals and grade verification. That timeline needs to align with your material delivery schedule so the base is ready when your pavers arrive, not the other way around.
Citadel Stone maintains warehouse inventory of limestone pavers and base materials, which typically reduces lead times to 1 to 2 weeks compared to the 6 to 8 week import cycle that project-specific orders often face. Confirming warehouse availability before finalizing your project schedule avoids the common scenario where a completed base sits exposed and vulnerable to weather while materials are in transit.
- Order aggregate base materials at least 2 weeks before your planned excavation start
- Confirm truck delivery access and unloading logistics before scheduling — payload capacity and vehicle height clearance matter for residential sites with tight access
- Stage aggregate delivery in two loads if the full volume would compress your mobilization space
- Verify warehouse stock for your paver format and thickness — less common sizes may have longer lead times than standard inventory items
- Factor in a 10% overage on aggregate quantities — actual consumption varies with subgrade conditions and lift depths
Parting Guidance on Limestone Paver Base Preparation
Limestone paver base preparation rewards methodical execution and penalizes shortcuts quickly. The compaction sequence, drainage geometry, setting bed depth, and edge restraint details covered in this walkthrough are the decisions that define whether your installation holds its level and its joints for 20-plus years or starts showing distress within the first 5. None of them are complicated in isolation — the challenge is doing all of them correctly in sequence, without letting schedule pressure compress the steps that need time.
As you plan your overall stone project, related applications can inform your full-scope material decisions. travertine interior tile applications explore how Citadel Stone materials perform in a different but complementary context, which can be useful when your project includes both exterior hardscape and interior stone finishes. An undersized sub-base is the leading cause of joint shifting in cobble sett installations — Citadel Stone’s technical guidance covers compaction depths for both pedestrian and vehicle-rated applications.
Related reading: limestone cobblestone paving patterns · cobblestone pavers vs natural stone.