A Module Wearing a Disguise
The French pattern earns its reputation backwards. Buyers see a floor with no obvious repeat, assume custom stonework, and price it in their heads accordingly – when what they are looking at is four stock sizes in a fixed arrangement, repeated until the terrace runs out. Long straight joints are designed out of the field, the eye finds no grid to follow, and the whole effect comes off a cutting list any good supplier can run. It is the highest-looking return on ordinary rectangles in the paving trade, which is precisely why it spread from the grand terraces it is named for to pool decks and courtyards everywhere: the aristocratic look survives contact with an ordinary budget. What follows is everything a buyer or installer needs to hold in their head – the sizes, the arithmetic, the rules, and the handful of mistakes worth avoiding.
The Four Sizes
The classic set, in one shared thickness:
- 8 x 8 inches (200 x 200 mm) – the small square that breaks the joints
- 8 x 16 inches (200 x 400 mm) – the half rectangle
- 16 x 16 inches (400 x 400 mm) – the large square
- 16 x 24 inches (400 x 600 mm) – the anchor rectangle
The proportions matter more than the units: every size is a clean multiple of the smallest, which is what lets the module close without slivers. Kits in metric or imperial lay identically.
The Module Math
One of each size covers 832 square inches – just under six square feet – and that one-of-each group is the working yardstick for sizing an order, even though laid fields consume the four sizes in kit proportions rather than strictly one apiece. Practical ordering:
- Divide the area by 5.8 square feet to size the order in one-of-each groups, and round up
- Order complete sets in the kit proportions your supplier confirms – a delivery short of one size strands the layout
- Carry about five percent for edge cuts at borders and walls
- Add one spare set against the repair that arrives years later, when matching stock is hardest
Because the module does the fitting, field waste stays low – the French pattern is cheaper to lay than its looks admit.
The Laying Rules
Three rules keep the illusion intact:
- Keep the module orientation consistent – rotating repeats for variety creates the very alignments the pattern exists to avoid, because the module was already designed to break them
- Keep straight joint runs short – if a joint runs straight across three or more pieces, something is sitting in the wrong slot, and it is worth lifting while the bedding is fresh
- Start square to the main sightline, not to the nearest wall – the first repeat governs every one after it, and walls are rarely as straight as they look
Installers who chalk the first module full-size on the bedding before committing a single stone rarely put a piece wrong for the rest of the job – and offsetting each course of repeats keeps the module seams from ever aligning into a visible grid.
Where the Pattern Works
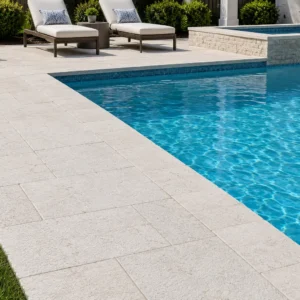
The module shines where a large plain field would look institutional: terraces and pool surrounds, garden rooms, interior floors running out through glazed doors to outside. It reads equally well in a soft white limestone cut as a module set for pale courtyards or in shellstone where texture should lead. Small spaces are the one caution – under roughly sixty square feet the module barely repeats, and a simpler bond serves better.
Joints, Finish and the Surface That Results
The module fixes the geometry; the joint and the finish decide the mood. A tight three-to-five millimeter joint in a color close to the stone lets the four sizes read as one quiet surface, which is how the pattern behaves in formal courtyards. Open the joint slightly and darken it, and every piece declares itself – more rustic, more texture, more shadow. Finishes follow the same lever: brushed and tumbled faces soften the module into something old, while a honed face in the same sizes reads crisp and contemporary. The pattern itself never changes; the whole range of character between farmhouse and gallery comes from those two decisions around it.
The Mistakes That Break the Illusion
When a French pattern fails, it fails one of four ways, all preventable at ordering or setting-out:
- Mixed thicknesses – pieces sourced from different runs that lip at the joints and cast shadows no sealer fixes
- Broken proportions – substituting a near-size when one piece runs short, which the eye catches from across the garden
- Rotated modules – the repeat turned for variety, creating the through-joints the pattern exists to avoid
- Starting from a wall instead of the sightline – inheriting the wall’s error across the whole field
Every one of these traces back to treating the module casually. Ordered as sets, chalked out once and laid with the orientation kept, the pattern is close to failure-proof.
Ordering the Set
Send the area and the exposure – interior, terrace, pool edge – and the quote comes back as modules: piece counts per size, one calibrated thickness, finish options, the waste margin stated plainly. Browse the paver and tile range for the material families the module cuts from, and lay one dry set on delivery before bedding anything: five minutes with the first module on the ground teaches more than any diagram, and it confirms the delivery against the cutting list while the truck is still worth calling. The French pattern is a cutting list, not a luxury – four sizes, one module, repeated with discipline.
Coverage, Waste and Ordering by the Set
The French pattern is bought by the set, not by the piece, and that is what keeps its waste low. Inside the field nothing is cut at all, because the four sizes are designed to tile without remainder. Everything you pay for in cutting happens at the boundary, where part modules have to be filled.
| Pattern | Straight edges | Curved or angled edges | What drives the number |
|---|---|---|---|
| French or four-size module | 5-8% | 10% | the module edge has to be filled with part pieces |
| Running bond, laid parallel to the edge | 5% | 8% | half-unit closers only, all at the perimeter |
| Random flagstone | 10-15% | 15% | selection loss on top of fitting cuts |
| Border or soldier course | add 5% on the run | add 8% | mitered corners and short closers |
Where the set is natural stone, confirm the absorption and density of the actual batch rather than the commercial name, because both vary widely within one variety, as the reference material on limestone sets out.
Setting Out So the Module Lands Whole
The single decision that determines how a French pattern looks is where the first full module is placed. Start in the wrong corner and the most visible edge of the terrace is a row of part pieces.
- Set out from the most visible edge, usually the threshold or the pool coping
- Dry-lay one full module and measure it before committing to the grid
- Push the part modules to the least visible boundary
- Rotate alternate sets so the same size does not stack into a visible run
- Keep one set in reserve for repairs, since the four sizes must match as a family
How the set is bedded matters as much as how it is set out, and drainage, movement and substrate all bear on the result, per the guidance on detailing natural stone paving for durability.
French pattern layout, ordered once and cut right
The pattern intimidates people because it looks bespoke. It is not. It is four sizes and one repeating module, and once the module is understood the ordering is arithmetic.
- Order by the set, with the coverage per set confirmed in writing
- Allow for part modules at the boundary, not across the field
- Fix the joint width before calculating coverage
- Hold a spare set from the same batch for later repairs
How the module compares with the simpler bonds on cost and cutting sits in our paver laying pattern library.
Learn the module once and the French pattern stops being a mystery and becomes a cutting list.