Quick Primer: What “Granite Grade” Means
Granite quality grades explained through industry classification systems that evaluate appearance rarity, structural integrity, slab yield, and manufacturing intervention. Grading reflects a combination of visual appeal (color uniformity, veining drama, pattern consistency), physical soundness (absence of hairline cracks, stable structure without excessive resin fills), and quarry rarity (common domestic versus exotic imported stone).
Suppliers use varying terminology—some label grades as “commercial,” “standard,” “premium,” while others use numeric systems. This guide adopts a Level 1–5 scale for clarity: Level 1 represents basic economy granite with simple patterns and potential structural aids like resin stabilization; Level 5 denotes premium rare slabs with dramatic natural beauty and minimal manufacturing intervention.
Grade directly impacts usable slab yield—lower grades may require working around fissures or weak zones, increasing waste and fabrication difficulty. Higher grades offer consistent color across full slabs, simplifying seam matching and reducing installer risk. Understanding these grade distinctions helps Arizona buyers match stone quality to project demands and budget realities.
Level-by-Level Walkthrough: What to Expect for Levels 1–5
Level 1: Economy Granite — Basic Patterns & Entry Cost
Definition: Simple, consistent colors (solid blacks, beiges, standard speckled patterns) sourced from high-volume domestic or readily available quarries. Minimal veining or dramatic features.
Visual cues: Uniform color with small-grain speckle pattern; predictable appearance slab-to-slab; limited color variation or natural drama. Think solid black, tan speckle, or basic gray granite found in builder-grade projects.
Structural cues: May include light resin stabilization to fill micro-fissures or surface porosity; inspect under strong light for subtle sheen indicating resin presence. Occasional hairline fissures that don’t compromise strength but affect appearance.
Slab yield: High usable percentage (85–95%) due to consistent structure and minimal pattern-matching needs. Simple layouts maximize material efficiency.
Durability expectations: Suitable for standard residential countertops, bathroom vanities, and light commercial use. Adequate structural integrity for typical kitchen spans with proper support. Increased porosity compared to higher grades requires regular sealing (every 6–12 months).
Recommended applications: Budget remodels, rental properties, secondary vanities, laundry counters, backsplash material, and projects where cost control outweighs visual impact.
Value guidance: Best choice when appearance is secondary to budget. Level 1 granite performs adequately with proper sealing and maintenance but lacks the visual interest of higher grades.
Level 2: Standard Builder Granite — Reliable Moderate Patterns
Definition: Mid-range domestic granite with moderate pattern variation—light veining, two-tone blends, subtle movement. Common in tract-home upgrades and standard kitchen renovations.
Visual cues: Noticeable veining or color variation within cohesive palette; some slabs show fossil inclusions or mineral clusters adding interest. Color consistency adequate but not perfect slab-to-slab.
Structural cues: Minimal resin intervention; occasional natural fissures that are stable and part of stone character rather than structural defects. Inspect edges for resin pooling—minimal presence is acceptable.
Slab yield: Good usable percentage (75–85%) with careful planning around pattern flow. Seam matching requires attention to vein direction but remains straightforward.
Durability expectations: Solid performance for indoor kitchens, bathroom counters, and moderate-traffic commercial applications. Porosity slightly lower than Level 1, requiring sealing every 8–14 months depending on use and finish.
Recommended applications: Primary kitchen counters in family homes, master bathroom vanities, kitchen islands in mid-range renovations, and commercial break rooms or office kitchens.
Value guidance: Excellent balance between cost and appearance for most Arizona residential projects. Delivers visual interest without premium pricing.
Level 3: Mid-Grade Designer Granite — Pattern Complexity & Color Range
Definition: Imported or select domestic granite with distinctive veining, multi-tone colors, and recognizable patterns. Offers design flexibility and visual impact at moderate premium.
Visual cues: Dramatic veining, movement, or contrasting color bands; each slab unique with identifiable character. Colors range from exotic blues and greens to rich earth tones and striking multicolor blends.
Structural cues: Tight structure with minimal resin use; natural fissures are rare and typically stable. Back-side inspection shows dense, uniform composition. Higher quality control at quarry level.
Slab yield: Moderate usable percentage (70–80%) as fabricators work around pattern flow and book-matching requirements for visible seams. More selective cutting to showcase veining increases waste.
Durability expectations: Excellent performance for all residential applications including outdoor covered kitchens (with proper sealing). Lower porosity than Level 1–2 allows 12–18 month sealing intervals for indoor use.
Recommended applications: Feature kitchen islands, open-concept kitchen counters, luxury bathroom vanities, fireplace surrounds, and high-visibility commercial lobbies or showrooms.
Value guidance: Best value granite Arizona choice for buyers seeking distinctive appearance without top-tier pricing. Level 3 delivers lasting visual appeal and strong durability, justifying moderate premium over builder-grade options.
Level 4: Premium Granite — Rare Patterns & Superior Quality
Definition: Exotic imported slabs with striking patterns, unusual colors, or exceptional uniformity. Quarried in limited quantities from specific regions known for distinctive stone.
Visual cues: Bold veining, unique color combinations (blues, violets, deep reds, dramatic blacks with metallic flecks), or museum-quality consistency. Slabs make immediate visual statements and drive room design.
Structural cues: Flawless structure with virtually no resin intervention; back-side shows dense, tight grain with no voids or weak zones. Factory quality control ensures only top-grade slabs receive Level 4 designation.
Slab yield: Lower usable percentage (65–75%) due to careful pattern placement, book-matching for seamless appearance, and waste from selective cutting to maximize visual impact. Each slab treated as artistic element.
Durability expectations: Superior performance across all applications including fully exposed outdoor kitchens, high-traffic commercial floors, and demanding environments. Dense structure resists staining and requires minimal sealing (12–24 months for indoor, 6–12 months outdoor).
Recommended applications: Luxury kitchen islands, statement bathroom vanities, high-end commercial reception desks, boutique hotel counters, and projects where granite serves as focal design element.
Value guidance: Justified premium for showcase installations, luxury resale markets, and projects where distinctive appearance creates measurable property value. Requires careful fabrication and installation to honor slab investment.
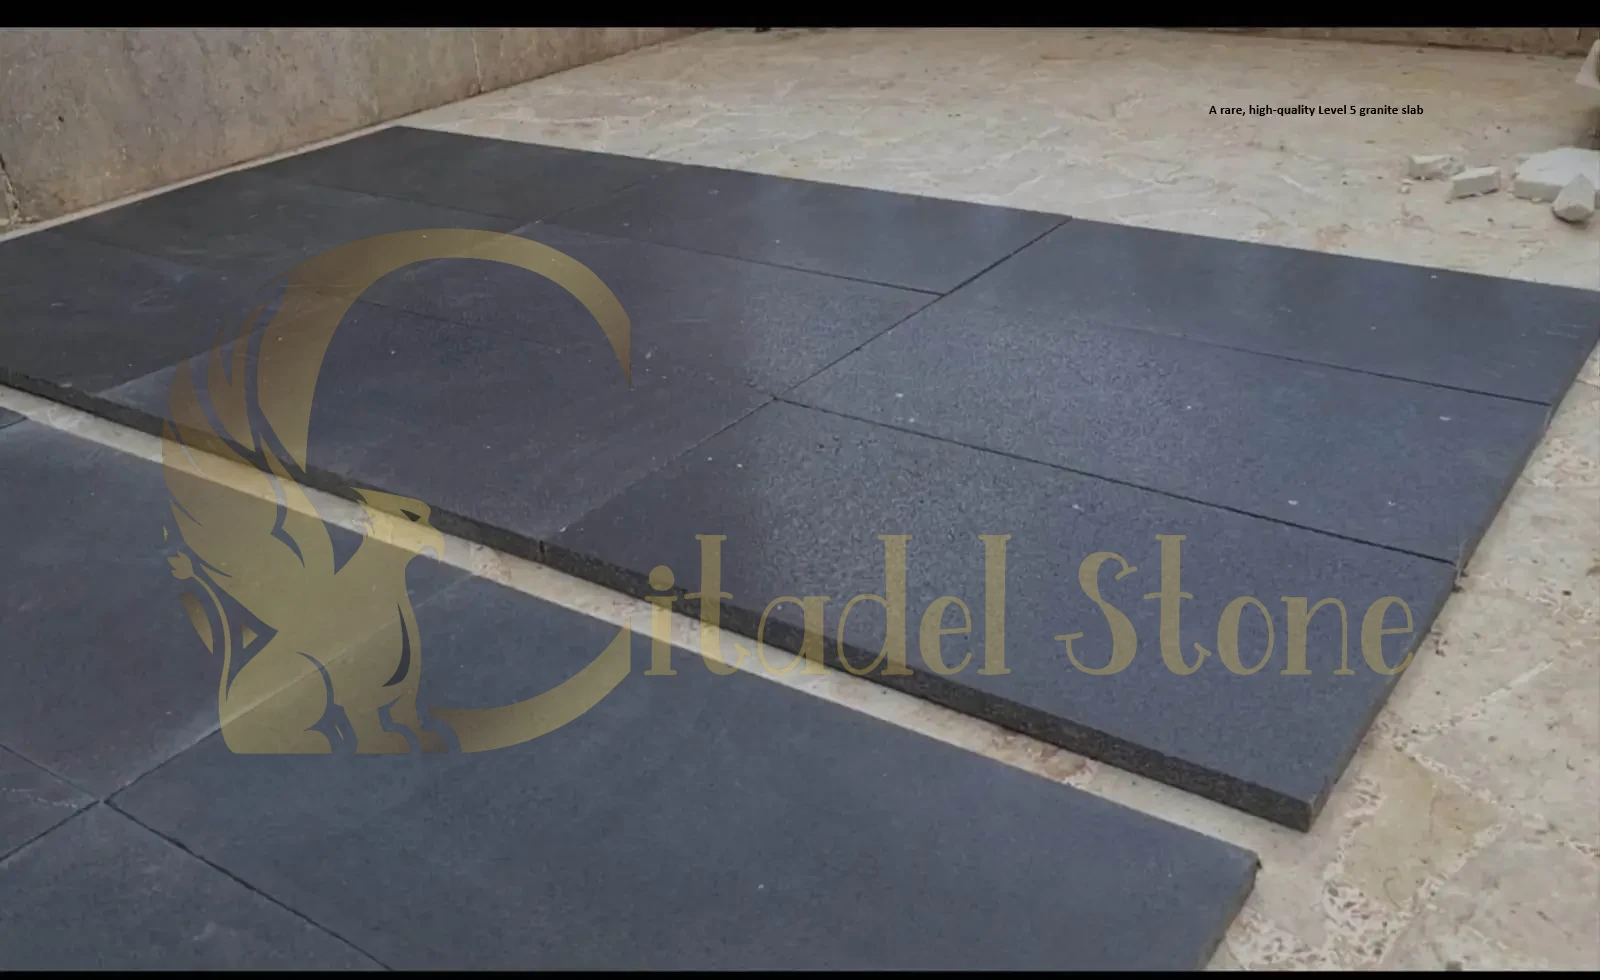
Level 5: Ultra-Premium Rare Granite — Investment-Grade Stone
Definition: Museum-quality slabs from rare quarries, often with proprietary names or limited-edition releases. Exceptional rarity, pristine structure, and breathtaking visual impact.
Visual cues: One-of-a-kind patterns, extraordinary color combinations, dramatic book-matching potential, or perfect uniformity impossible to replicate. Each slab is individually photographed and inventoried as unique art piece.
Structural cues: Flawless throughout; zero resin, zero fissures, perfect density. Back-side inspection reveals consistent grain structure. Quarry certifications and provenance documentation standard.
Slab yield: Variable (60–70%) as fabricators prioritize pattern showcase over material efficiency. Every cut decision considers visual flow and statement impact. Waste is accepted to achieve perfection.
Durability expectations: Absolute top performance in all conditions. Dense structure, minimal porosity, exceptional stain resistance. Suitable for any application without compromise.
Recommended applications: Feature walls, luxury penthouse kitcharts, statement commercial lobbies, high-end boutique retail, museum installations, and projects where budget accommodates art-level stone investment.
Value guidance: Reserved for projects where granite is central design feature and budget is secondary consideration. Often purchased sight-seen with individual slab selection and photographic approval process.
Granite Level 1 vs Level 5 Arizona buying decisions depend on project goals: Level 1 works for budget-conscious functional installations, while Level 5 targets luxury markets where stone quality directly impacts property positioning and resale value.
Visual & Physical Inspection Checklist
Use this step-by-step protocol when evaluating slabs in supplier yards or reviewing virtual slab presentations:
Pre-inspection preparation:
- Request slab ID numbers or quarry lot codes before viewing.
- Bring smartphone or camera for documentation.
- Schedule yard visits during midday (10 AM–2 PM) for best natural light assessment.
- Wear neutral clothing to avoid color-cast reflections on polished slabs.
Visual inspection steps:
Step 1 — Slab ID verification: Confirm physical slab matches quoted ID number; photograph tag showing ID, dimensions, and grade designation.
Step 2 — Face-side inspection (outdoor light preferred): View slab outdoors or in bright natural light to assess true color, veining consistency, and pattern flow. Rotate viewing angle to detect resin fills (they reflect differently than natural stone).
Step 3 — Back-side inspection: Examine unpolished back for hairline cracks, voids, or structural inconsistencies. Dark lines or spider-web patterns indicate potential fracture risk. Dense, uniform back-side suggests higher structural grade.
Step 4 — Light-transmission test: In dim lighting, shine flashlight through slab edge or hold up to bright window. Excessive light transmission or visible shadows indicate thin spots, repairs, or structural variations.
Step 5 — Feel test for resin: Run palm across polished surface—natural granite feels cool and slightly textured even when polished; heavy resin creates plastic-like smoothness or warmth. Check edges for visible resin pooling.
Step 6 — Thickness and flatness measurement: Use digital caliper or thickness gauge at multiple points; variation exceeding 2–3 mm suggests manufacturing issues. Place straightedge across slab to check for bowing or warping.
Step 7 — Edge and corner inspection: Check slab perimeter for chips, previous repair attempts, or unstable edges that may crack during fabrication.
Step 8 — Photography documentation: Capture full-slab overview plus detail shots of veining, color transitions, and any concerns. Photograph front, back, and all four edges.
Simple field tests:
Water-drop absorption test: Place small water drop on unpolished back-side or edge; observe absorption speed. Immediate darkening indicates high porosity (typical of lower grades); beading or slow absorption suggests denser structure (higher grades).
Tap-sound test: Gently tap slab with knuckle or coin in several locations. Consistent clear ring indicates solid structure; dull thud or variation in sound suggests delamination, resin layers, or internal voids.
Test failures and grade implications:
- Rapid water absorption → likely Level 1–2; requires frequent sealing.
- Dull tap sound → possible structural repairs or resin backing; verify grade and request disclosure.
- Visible back-side cracks → acceptable if stable and disclosed; affects yield and fabrication cost.
- Excessive resin sheen → common in Level 1–2; not inherently problematic but confirms grade classification.
Durability by Grade — What Performance to Expect
Granite durability by grade correlates directly with stone density, porosity, and structural integrity. Understanding performance expectations prevents mismatches between grade and application.
Porosity and staining:
- Level 1–2: Higher porosity requires sealing every 6–12 months; absorbs oils and acidic liquids more readily; honed finishes increase absorption risk.
- Level 3: Moderate porosity; indoor applications need sealing every 12–18 months; adequate stain resistance with proper maintenance.
- Level 4–5: Low porosity; sealing every 18–24 months sufficient for indoor use; dense structure naturally resists most household stains.
Fracture and chip risk:
- Level 1–2: Natural fissures and resin repairs may propagate under stress; edges more vulnerable to chipping; avoid unsupported spans exceeding 18 inches without substrate reinforcement.
- Level 3: Stable structure handles standard residential loads; edge durability good with rounded profiles; suitable for typical 24-inch overhangs with proper support.
- Level 4–5: Excellent fracture resistance; edges durable even with ornate profiles; handles large unsupported spans and heavy loads confidently.
Resin-fill longevity:
- Resin-stabilized slabs (common in Level 1–2) perform adequately indoors but degrade faster under UV exposure, extreme temperature cycling, and chlorinated water. Outdoor applications in Arizona sun may show resin yellowing or delamination within 3–5 years.
- Higher grades with minimal resin maintain appearance and integrity longer in demanding Arizona conditions.
Application-specific durability guidance:
Outdoor kitchens (full sun exposure): Prefer Level 3 minimum; Level 4–5 ideal for Arizona’s extreme UV and temperature swings. Resin-heavy Level 1–2 grades risk degradation.
Pool surrounds and wet areas: Level 3–4 recommended due to lower porosity and chlorine resistance; frequent sealing mandatory regardless of grade.
Commercial high-traffic floors: Level 3 minimum for durability and stain resistance; Level 4–5 for luxury retail or hospitality where appearance must endure heavy use.
Standard residential kitchens: Level 2–3 provides excellent performance-to-cost ratio; Level 1 acceptable for budget projects with realistic maintenance expectations.
Best Value Guidance — Matching Grade to Budget & Use
Smart granite selection balances grade quality against project priorities, room function, and resale considerations.
When to choose Level 1–2:
- Secondary spaces with low visibility (laundry rooms, powder room vanities, small prep sinks).
- Rental properties or flip projects prioritizing cost control over premium appearance.
- Backsplash material where smaller pieces eliminate yield concerns.
- Projects with limited budgets requiring functional stone without design focal-point needs.
- Temporary installations expected to be replaced within 5–10 years.
When Level 3 offers best value:
- Primary kitchen counters in family homes—delivers visual interest and durability at moderate premium.
- Bathroom vanities in master suites or guest baths where appearance matters.
- Kitchen islands in mid-range remodels balancing cost and resale appeal.
- Commercial break rooms, office kitchens, and professional spaces requiring durable, attractive surfaces.
- Best value granite Arizona recommendation for most residential projects seeking long-term satisfaction without luxury pricing.
When to invest in Level 4–5:
- Feature islands in open-concept luxury homes where granite drives room design.
- High-end resale markets (Scottsdale, Paradise Valley, North Scottsdale) where premium materials are expected.
- Commercial lobbies, boutique hotels, upscale retail where stone makes brand statement.
- Projects using granite as architectural art element rather than functional surface.
- Buyers prioritizing distinctive appearance and willing to pay for rarity and perfection.
Budget mapping by room and priority:
High-visibility primary spaces (kitchen island, open-concept counters): Level 3–4 for visual impact and resale value.
Standard functional spaces (perimeter counters, standard vanities): Level 2–3 for balance of performance and cost.
Low-visibility secondary spaces (laundry, butler pantry, secondary baths): Level 1–2 to control budget without sacrificing function.
Outdoor exposed applications (patio kitchens, pool bars): Level 3 minimum to ensure Arizona UV and weather durability.
Commercial hospitality (hotel lobbies, upscale dining): Level 4–5 to project quality and withstand scrutiny plus heavy use.
Price Signals & How to Compare Quotes
Understanding what drives quoted prices helps identify fair value versus markup.
Material cost line items related to grade:
- Slab cost per square foot: Increases significantly by grade—Level 1 establishes baseline; Level 3 typically 40–70% higher; Level 5 can be 200–400% higher than Level 1.
- Yield percentage and waste allowance: Lower grades allow higher yield (less waste), reducing material cost. Higher grades require selective cutting, increasing waste allowance (typically 15–25% for Level 3–5 versus 10–15% for Level 1–2).
- Fabrication difficulty: Dramatic veining in higher grades complicates seam matching and pattern flow, adding CNC time and increasing labor costs 20–40% versus simple Level 1 slabs.
Requesting transparent quotes:
- Demand specific slab ID numbers in written quotes—this prevents substitution and allows verification.
- Ask for yield estimates based on your layout; compare waste allowances across quotes.
- Request photos of exact reserved slab before fabrication begins.
- Insist on full-slab viewing for Level 3+ projects where pattern and color consistency affect final appearance.
Price comparison protocol:
- Collect three itemized quotes separating material grade, slab ID, fabrication complexity, and waste allowance.
- Visit yards to view recommended slabs; photograph and document slab IDs.
- Compare apples-to-apples by confirming each quote references similar grade and yield assumptions.
- Question significant price variations—verify whether lower quotes substitute grades or increase hidden waste fees.
Supplier Red Flags & Verification Steps
Protect your investment by identifying questionable practices and verifying grade authenticity.
Red flags indicating grade misrepresentation:
Heavy resin stabilization not disclosed: Slab feels plastic-smooth or shows uniform sheen inconsistent with natural granite; supplier hesitates when asked about resin percentage.
Dyed or resurfaced slabs: Color appears unnaturally uniform or edges show different color than surface; ask directly whether slabs are dyed or treated post-quarry.
Inconsistent slab tagging: Tags missing, generic labels without quarry origin, or reluctance to provide slab ID numbers in quotes.
Pressure tactics around “last slab” claims: Urgency without documentation; refusal to hold slab with deposit while you verify grade.
Vague grade terminology: Avoiding specific level designations; using subjective terms like “builder select” or “contractor grade” without clear definitions.
Verification steps to authenticate grade:
Request quarry origin and certifications: Legitimate suppliers provide country of origin, quarry name, and any applicable certifications (e.g., NSF food-contact certification).
Ask for raw-slab photos: Pre-polishing photos show natural stone structure without surface treatments; compare to polished version you’re buying.
Inquire about resin stabilization percentage: Honest suppliers disclose resin use; typical range is 5–15% for Level 1–2, under 5% for Level 3, near-zero for Level 4–5.
Request references for similar-grade projects: Ask to contact previous customers who purchased same grade for installation photos and satisfaction feedback.
Verify slab reserve policy: Reputable suppliers provide written slab reservation with ID number, hold period, and deposit/refund terms.
Check supplier reviews for grade-substitution complaints: Search online reviews specifically mentioning grade mismatches or slab-swap issues.
Practical Buying Workflow for Arizona Projects
Follow this step-by-step process to ensure grade quality matches expectations:
Step 1 — Shortlist slabs by grade and budget: Define target grade based on application and budget. Request supplier inventory lists with slab IDs, photos, and grade designations.
Step 2 — View slabs in yard under local Arizona light: Schedule midday yard visits to assess color accuracy and glare in bright desert sun. View slabs outdoors whenever possible—Arizona light reveals undertones and flaws invisible indoors.
Step 3 — Reserve specific slab ID with deposit: Pay deposit to reserve your chosen slab; obtain written confirmation with slab ID, hold period, dimensions, and grade designation. Require supplier to mark slab with your name/project number.
Step 4 — Request fabrication mock-up or seam preview: For Level 3+ projects, ask fabricator to dry-lay slabs showing seam locations and pattern flow before cutting. Photograph dry-lay for approval documentation.
Step 5 — Require photographic delivery report: Before installation day, request photos showing slabs loaded for delivery, verifying slab ID tags match reserved material. Document condition before transport.
Step 6 — Final install inspection and sign-off: Inspect installed counters for seam quality, color match, edge finish, and overall grade consistency before signing completion paperwork. Note any discrepancies immediately.
Arizona-specific timing considerations:
- Avoid staging slabs in direct sun before fabrication—intense UV and heat can stress resin-stabilized Level 1–2 slabs.
- Schedule yard visits and installs during cooler months (October–April) when heat doesn’t distort color perception or complicate adhesive curing.
- Monsoon season (July–September) requires covered slab storage; confirm supplier has climate-controlled or protected staging.
See Where Contractors & Homeowners Actually Save Money: Granite Wholesale vs. Retail in Arizona!
City-by-City Buying Tips for Arizona’s Major Markets
Phoenix
Phoenix’s competitive market offers extensive slab inventory across all grade levels, but intense midday sun dramatically affects color perception. Dark polished granite appears different in morning versus afternoon light. Action: Test shortlisted slabs outdoors at your supplier’s yard between 11 AM and 2 PM to assess true color undertones and glare characteristics; for full-sun kitchen islands, prefer mid-tone Level 3 or higher slabs to avoid heat-contrast surprises where dark granite becomes uncomfortably warm and light granite shows every smudge.
Tucson
Tucson’s drier climate and mineral-heavy water create visible residue on lower-grade porous granite. Dust accumulation happens quickly on smooth polished surfaces. Action: Check slab finishes specifically for dust-hiding ability by running your hand across the surface and observing whether fingerprints remain visible; confirm color pigment undertones by viewing slabs in afternoon light (2–4 PM) when Tucson’s golden-hour sun reveals warm or cool undertones that may clash with cabinet finishes.
Mesa
Mesa’s family-oriented renovation market typically targets mid-range budgets, making Level 3 the sweet spot for quality and value. Peak remodel season (March–May) depletes popular slab inventory quickly. Action: For family kitchen renovation projects, focus procurement on Level 3 slabs offering best cost-to-performance balance and long-term durability; reserve slabs early during peak spring season (by February) to secure preferred colors before high-volume builders deplete supplier inventory.
Chandler
Chandler’s new-home market and production timelines demand reliable slab availability and delivery coordination. Builders working multiple subdivision homes need consistent grade availability. Action: Confirm slab reserve and delivery windows align with construction finish schedules before committing to specific grades; for production builds in new subdivisions, verify supplier maintains adequate Level 2–3 inventory to fulfill multi-unit orders without substitution delays.
Scottsdale
Scottsdale’s luxury market expects Level 4–5 quality, flawless seam matching, and perfect book-matched veining for statement installations. Clients scrutinize grade authenticity and pattern flow. Action: For luxury Scottsdale projects, insist on full-slab in-person viewing at supplier yards rather than relying on photos; require seam mock-ups showing exact vein alignment and book-matching before fabrication approval, and document pattern-flow decisions photographically to prevent disputes over final appearance.
Glendale
Glendale’s established neighborhoods include older homes with access limitations affecting slab delivery. Narrow doorways and tight turns may require split-slab solutions that impact seam placement. Action: In retrofit and remodel work, verify slab dimensions fit transport routes by measuring doorways, hallways, and corners during templating; plan split-slab seam locations strategically to accommodate access restrictions while maintaining acceptable visual appearance, and confirm fabricator’s experience with challenging installations.
Gilbert
Gilbert’s outdoor living emphasis includes poolside kitchens and patio bars exposed to chlorine splash, irrigation minerals, and extreme UV. Lower-grade porous granite degrades quickly in these conditions. Action: For poolside granite installations or outdoor kitchens, require Level 3 minimum grade with documented low porosity and specify chlorine-resistant sealing protocols; request water-absorption test results and quarry certifications confirming UV stability and chemical resistance suitable for Arizona pool environments.
Tempe
Tempe’s rental property and multi-family markets prioritize durability and turnover-friendly maintenance over premium appearance. Quick procurement and local supplier availability matter. Action: For rental-turnover properties and investment builds, prioritize durable mid-grade (Level 2–3) slabs from local quick-turn suppliers offering shorter lead times; avoid exotic Level 4–5 grades requiring extended procurement or specialty fabrication that delays unit turnover and rental income.
Case Examples — Choosing Grade for Three Real Scenarios
Scenario A: Budget Kitchen Remodel — $8,000 Total Budget
Recommended grade: Level 2 standard builder granite with moderate pattern.
Inspection priorities: Verify structural soundness (tap test); confirm acceptable resin presence; check for stable natural fissures that won’t compromise functionality.
Procurement tips: Shop remnant inventory for single-slab solutions; accept simple eased edges to control fabrication cost; choose honed finish to hide daily wear and reduce maintenance visibility.
Outcome: Functional, attractive kitchen upgrade delivering good performance within tight budget. Level 2 provides adequate durability and visual interest without premium pricing.
Scenario B: Mid-Range Family Kitchen — $15,000–$20,000 Budget
Recommended grade: Level 3 mid-grade designer granite with distinctive veining.
Inspection priorities: Assess pattern flow and book-matching potential for visible island seams; verify low porosity through water-drop test; confirm minimal resin intervention.
Procurement tips: Reserve specific slab ID early in design phase; request seam preview showing vein alignment; specify rounded bullnose edges for family safety and chip resistance; choose light-to-mid tone to minimize Arizona heat absorption.
Outcome: Excellent balance of appearance, durability, and value. Level 3 creates visual focal point while maintaining realistic maintenance expectations and strong resale appeal. View the Granite Thickness & Edge Profile Selection Guide for Arizona Kitchens!
Scenario C: Luxury Statement Island — $30,000+ Budget
Recommended grade: Level 4–5 premium rare granite with museum-quality appearance.
Inspection priorities: Insist on in-person slab viewing; verify flawless back-side structure; confirm zero resin and perfect density; photograph full slab for pattern documentation.
Procurement tips: Work with designer to select slab driving room color palette; require book-matched waterfall fabrication with seam mock-up approval; specify complex edge profile (ogee or mitered waterfall); budget extended fabrication time for careful execution.
Outcome: Investment-grade installation where granite serves as architectural art. Level 5 justifies premium through rarity, flawless execution, and lasting visual impact that defines space.
Our granite information hub in Arizona — How to read Grade 1–5 granite and choose what’s right for your budget
Selecting granite for Arizona work often means balancing aesthetic intent, durability and lifecycle cost. A simple, usable grading system (Grades 1–5) can help procurement teams, specifiers and builders compare offers objectively — but the numbers themselves are only meaningful if you pair them with test data and mock-ups. Below is a practical, non-prescriptive guide that explains what each grade could represent, which laboratory and field checks you should request, and how to map choices to site realities in Peoria, Surprise, San Tan Valley and Yuma. All language is advisory: you would use these categories and checks as part of a transparent procurement conversation, not as an absolute certification.
Quick note on approach
Treat “Grade” as a shorthand that bundles appearance, expected variability, fabrication yield and likely maintenance demand. Ask suppliers to back any grade claim with measurable items (porosity, specific gravity, documented yield, full-slab photos and a mock-up). Accept only conditional assurances (would, could, recommended) in tender responses.
Grade overview — what each level could indicate
Grade 1 — Utility / commodity granite
Typical expectation: broadly available, modest slab selection, higher lot variability.
Suits: back-of-house counters, secondary worktops, or where budget control is primary and appearance tolerance is wide.
What to verify: porosity and abrasion figures (even commodity granite can vary); require full-slab photos before cutting.
Grade 2 — Value granite with modest consistency
Typical expectation: better-matched lots, reasonable yield and moderate veining.
Suits: mid-range residential counters where acceptable variance is reasonable and cost sensitivity matters.
What to verify: specific-gravity and a small full-panel mock-up under site lighting.
Grade 3 — Premium commercial / residential granite
Typical expectation: good visual consistency, stable mineral composition and predictable fabrication yield.
Suits: primary kitchen counters, prominent vanities, or public interiors where a balance of look and durability is required.
What to verify: abrasion resistance, documented nesting/yield plan and a mock-up demonstrating seam behavior.
Grade 4 — High-end selection with tight lot control
Typical expectation: closely matched slabs from selected blocks, lower visible variation, higher unit cost and stricter lot reservation.
Suits: designer interiors, continuous island tops, and installations where color continuity is essential.
What to verify: reserve a spare slab or pallet from the approved lot and request color-fastness and UV notes if exterior exposure is possible.
Grade 5 — Exotic / statement granite
Typical expectation: rare coloration or veining, potential for heavy resin work, higher fabrication complexity and premium pricing.
Suits: feature islands, large-format table tops or applications where a distinct stone is the focal point.
What to verify: full-slab inspection, resin-repair documentation, and an agreed acceptance test for seams and finish.
Tests and documentation to require (minimum set)
Water absorption / porosity — predicts stain risk and influences sealer choice.
Specific gravity — helps estimate thermal mass and structural behavior for spans.
Abrasion resistance (e.g., Mohs or appropriate lab test) — important where tracked grit or sand is expected.
Full-slab photos (face + back) and a nesting/yield report — avoids surprises in veining and usable area.
Sample panel mock-up (minimum 300×300 mm or larger) installed under project lighting for 24–72 hours.
Seam and finish verification — request a photographic record of polished seams or edge profiles from prior lots of the same grade.
Practical procurement clauses (copy-ready ideas you could adapt)
“Supplier to provide porosity and specific-gravity test reports and two full-slab photos for each proposed lot with the bid.”
“Deliver one full-size mock-up panel and hold one spare slab/pallet from the approved lot for 12 months.”
“Pre-shipment: submit palletized face photos and the nesting report 72 hours prior to dispatch. Mock-up acceptance (48–72 hours) required before bulk release.”
Site realities — map grades to Arizona microclimates
Peoria — suburban wear and tracked grit
Recommendation: favor at least Grade 3 for primary kitchen counters or require abrasion data and a retained spare slab for Grade 2 use. Frequent tracked grit means finishes and maintenance regimes should be part of the submittal.
Surprise — dry spells and episodic heavy rains
Recommendation: request grout/sealant guidance and a short wet-dry mock-up if veneer or backsplash intersects exterior exposures. Grades 3–4 are sensible where visual continuity and stain resistance matter.
San Tan Valley — open exposures and coarse desert dust
Recommendation: prioritize low-absorption, abrasion-resistant material (Grade 3+), and require a soiling + rinse trial on a sample panel to confirm cleanability and reflectance after dust deposition.
Yuma — extreme heat and long haul logistics
Recommendation: prefer thicker sections or Grade 3–4 for heavy-use tops; ask for heat-rated seam epoxy data and insist on shaded staging and verified transport protection to avoid finish damage in transit.
How to use mock-ups effectively (field protocol)
Install the panel in the approximate exposure and under the same lighting as final use.
Observe for 24–72 hours for color shift, dust pickup and initial cleaning behavior.
Run a simple water-drop test to confirm porosity response and a mild-cleaner swab to check residue behavior.
Record findings and attach them to the mock-up acceptance form before bulk release.
Decision shortcuts for busy teams
Want the safest balance? Specify Grade 3 with required test datasheets and a retained spare slab.
Budget-first with acceptable trade-offs? Consider Grade 2 but insist on porosity/abrasion data and a full-slab photo prior to nesting.
Feature statement with low tolerance for variation? Target Grade 4–5 and reserve material early.
Closing (what to ask suppliers right now)
Ask potential vendors for a single PDF that contains: full-slab photos, porosity and specific-gravity reports, a proposed nesting/yield plan and a mock-up delivery timeline. Those documents would let you translate a Grade label into measurable procurement risk and lifecycle expectations.
Conclusion — Simple Decision Flow & Next Steps
Understanding granite grade levels empowers smart buying decisions aligned with project goals and budgets. Define your priorities first—appearance drama versus cost control, showcase focal point versus functional surface, immediate budget versus long-term value. Inspect slabs using the provided checklist to verify grade authenticity and structural quality. Reserve specific slab IDs before fabrication and document every approval step photographically.
3-step decision flow:
- Define project priorities: Determine whether visual impact, budget control, or durability drives your selection; match grade level to these priorities using the guidance above.
- Inspect slabs with checklist: Visit supplier yards during Arizona midday light; perform visual, physical, and field tests; photograph front, back, and edges of shortlisted slabs.
- Reserve slab ID and document delivery: Pay deposit for specific slab ID; require written confirmation and photographic delivery verification; inspect installed granite before final sign-off.
Apply city-specific tips from Phoenix, Scottsdale, Tucson, and other Arizona markets to navigate local supplier landscapes and climate considerations successfully. Citadel Stone is the Granite supplier Arizona builders trust for consistent inventory and bulk discounts.