Why Large-Format Limestone Works for Indoor–Outdoor Flow
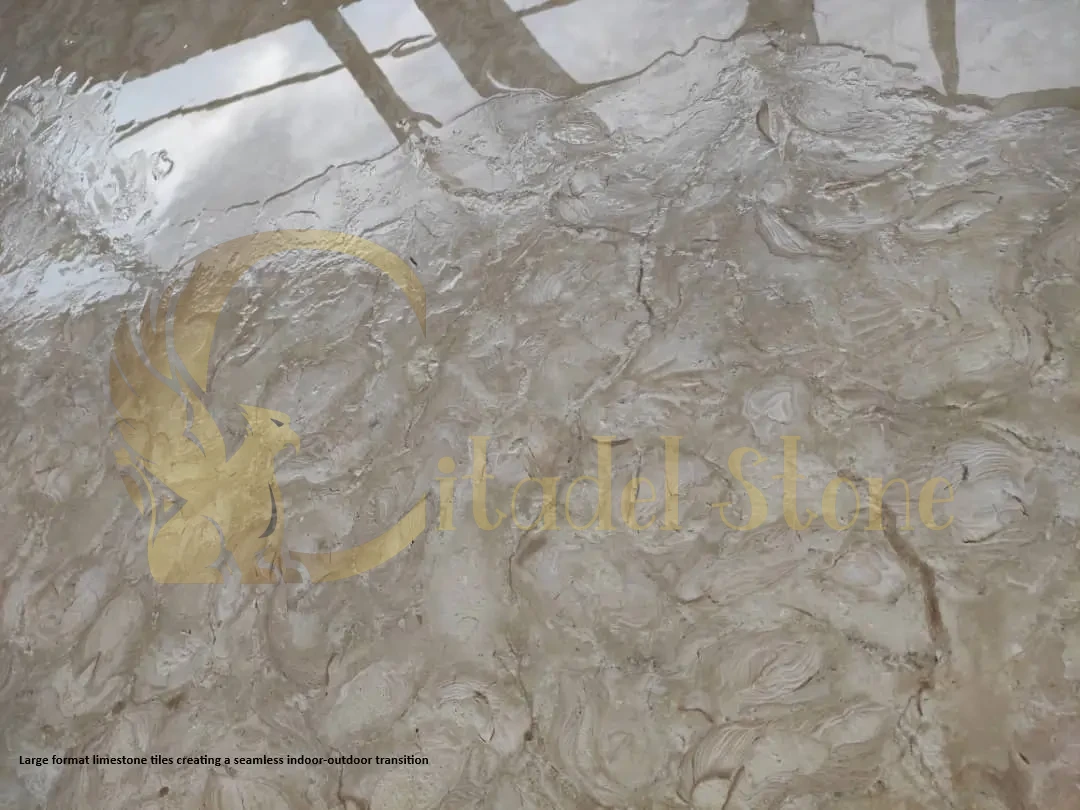
Large-format limestone tiles—typically 24×48 inches, 48×48 inches, or even 60×60 inches—minimize grout lines, the visual interruptions that fragment a floor plane. Fewer joints mean the eye travels unimpeded from conditioned interior to shaded terrace, reinforcing the perception of a single, expansive surface. Limestone’s inherent warmth and textural subtlety complement Arizona’s intense natural light; the stone absorbs and diffuses brightness rather than creating harsh reflections, a quality ceramic and polished porcelain often lack.
Natural limestone offers a color palette ideally suited to desert living: soft beiges, taupes, warm grays, and ochres that echo the native landscape. These mid-tone neutrals hide the fine dust that settles daily on exterior surfaces, reducing visible soiling between cleanings. The material’s matte to low-luster finishes integrate comfortably with stucco walls, exposed timber, and steel frames—the vocabulary of contemporary Southwestern design.
Architects favor extra-large formats because installation labor and joint material decrease per square foot, and the result feels more refined and intentional. A 48×48-inch tile carries the same visual authority as a cut stone paver but installs with modern thin-set methods, providing design flexibility at multiple scales. When the same tile size, color lot, and finish extend from foyer through threshold to courtyard, the architecture feels coherent and the living experience more generous. This principle—modern Arizona home design limestone as a unifying element—has become central to high-performance residential work across the state.
Format, Finish & Color: Designer Decisions that Matter
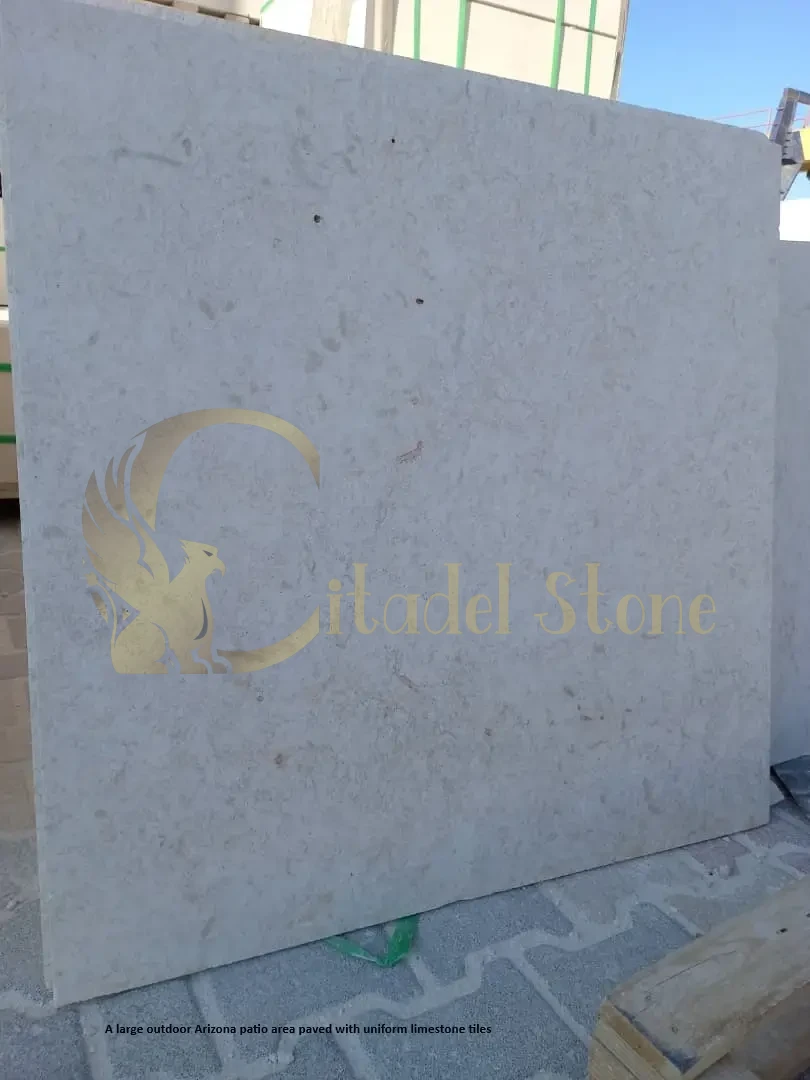
Choosing the right slab dimensions begins with evaluating sight lines and proportions. A 24×48-inch format works well in narrower galleries and corridors, while 48×48-inch and 60×60-inch tiles suit open-plan great rooms and expansive patios. Larger formats reduce joint frequency but demand flatter substrates and more precise setting; lippage becomes more visible as tile area increases. For residential applications, 10mm to 12mm nominal thickness suffices for interior floors; exterior installations over pedestals or exposed to vehicular loads may require 20mm thickness. Always verify structural capacity and substrate deflection limits with the project engineer.
Finish selection directly impacts comfort and safety. Honed finishes—smooth but not polished—offer low reflectivity and moderate slip resistance, suitable for most interior and covered outdoor areas. Brushed or tumbled finishes increase texture and traction, ideal for pool decks and fully exposed patios subject to rain. Thermal (flamed) finishes, common in granite, are less typical for limestone but can be sourced for high-traffic barefoot zones. Avoid polished finishes outdoors; they become slippery when wet and show wear quickly under grit.
Color choice in Arizona must account for solar heat gain and visible dust. Light tones—creamy beiges and pale grays—reflect more solar radiation, keeping surfaces cooler underfoot during summer afternoons. However, they also show dust more readily than mid-tone taupes and tans. Dark charcoals and deep browns absorb heat aggressively and are generally unsuitable for unshaded exterior zones.
Before committing to a full order, request sample panels measuring at least 4×4 feet (approximately sixteen 24×24-inch pieces or four 48×48-inch tiles) drawn from the specific lot reserved for your project. Install this mockup on site, spanning the threshold if possible, and review it at different times of day. Confirm color consistency, finish uniformity, and joint appearance under natural light. This on-site mockup becomes the acceptance standard for the production shipment.
Installation Systems that Preserve the Seamless Look
Achieving seamless patio to living room tiles requires careful coordination of substrate preparation, setting materials, and joint detailing. Interior floors typically employ thin-bed, full-bedding methods: the limestone adheres directly to a flat concrete slab using large-format tile mortar with extended open time and non-sag properties. Choose mortars rated for large and heavy tile (ANSI A118.15 or equivalent) to ensure adequate bond strength and prevent voids.
Exterior installations offer two primary strategies. Direct-bond systems mirror interior methods but demand mortar and grout formulations resistant to freeze-thaw cycles (relevant in Prescott and Flagstaff) and capable of accommodating slight substrate movement. Pedestal systems elevate tiles on adjustable supports, creating a drainage void beneath and allowing independent movement of the paving plane. Pedestals simplify slope management and utility access but introduce a height difference at the threshold unless interior floors are raised to match.
Grout joint width influences the seamless aesthetic profoundly. For large-format limestone, specify 3mm to 6mm joints; narrower joints (3mm) emphasize continuity but require exceptional substrate flatness and tile calibration. Wider joints (6mm) offer more installation tolerance and accommodate slight size variation between tiles. Use non-sanded epoxy grout for joints under 3mm and sanded cementitious grout for wider joints; epoxy resists staining and moisture penetration but costs more and demands skilled application.
Lippage—vertical displacement between adjacent tile edges—must be controlled to within 1mm for a truly seamless appearance. Use lippage-control systems (clip-and-wedge devices) during installation and verify substrate flatness to 3mm over 3 meters before tile setting begins.
Threshold transitions demand meticulous detailing. Recessed linear drains positioned just outside the door plane intercept water before it reaches the interior. Flush thresholds require door sill profiles with integrated weather seals and weep systems. For extra large stone tile installation Phoenix projects, coordinate with door manufacturers early to ensure sill heights, seal compression, and finish floor elevations align precisely.
Expansion, Joints & Moisture: Preventing Cracks and Movement
Limestone and the concrete substrates beneath expand and contract with temperature and moisture changes—behavior amplified in desert climates where daily swings of 30°F to 50°F are common. Properly located movement joints prevent cracking and tenting by allowing controlled differential movement.
Place perimeter movement joints at all building edges where tile meets walls, columns, or dissimilar materials. These joints should be 6mm to 10mm wide (example estimate—verify with engineer), filled with compressible backer rod and a flexible sealant rated for exterior exposure and UV resistance. Interior control joints aligned with structural slab joints prevent reflective cracking; continue these joints through the tile plane at matching locations.
For indoor outdoor flow stone flooring, coordinate joint layout so interior and exterior joints align visually and functionally. A misaligned joint pattern disrupts the seamless illusion and may allow water infiltration. Minimum joint widths for large-format limestone in Arizona’s climate typically range from 3mm for climate-controlled interiors to 6mm or wider for fully exposed exteriors (estimates—consult project engineer and tile manufacturer technical data sheets).
Perimeter edge details—such as the juncture between tile and stucco wall base or the tile-to-gravel transition at a garden edge—must accommodate thermal expansion without constraining the paving plane. Use resilient edge profiles or maintain a clear gap sealed with flexible joint compound.
Drainage design prevents water from pooling at the interior-exterior interface. Slope exterior surfaces a minimum of 2% away from the building (verify local code). Install waterproof membranes under tile in wet areas and at thresholds, lapping membranes into door pans and ensuring continuity. Substrate preparation should include crack-isolation membranes where slab control joints exist, decoupling the tile plane from substrate movement and reducing the risk of disbonding or tile fracture.
Thermal & Comfort Considerations for Arizona Living
Limestone’s thermal mass moderates temperature fluctuations: the stone absorbs heat during the day and releases it slowly at night. In a shaded Arizona courtyard, this effect creates comfortable evening conditions. In full sun, however, even light-colored limestone can reach uncomfortable surface temperatures by mid-afternoon.
Finish and color influence thermal performance measurably. Honed light beige limestone will feel cooler underfoot than brushed dark gray stone, all else equal. Reflective finishes bounce solar radiation while textured finishes increase surface area and heat retention slightly. During summer months, pair unshaded limestone patios with overhead structures—ramadas, pergolas, shade sails—to reduce direct solar gain. Ceiling fans improve perceived comfort by increasing air movement across the stone surface.
Interior zones benefit from the stone’s thermal stability; large-format limestone floors paired with radiant heating systems provide gentle, even warmth during winter months in higher-elevation cities. Conversely, summer cooling strategies—tile floors stay naturally cool in conditioned spaces—make limestone appealing in Phoenix and Tucson, where homeowners walk barefoot indoors year-round.
Thermal behavior differs significantly between direct-bond and pedestal installations. Pedestal systems allow air circulation beneath the paving plane, reducing heat buildup and improving comfort. Direct-bond systems couple the tile thermally to the substrate, which may be advantageous (if slab is insulated and conditioned) or disadvantageous (if substrate absorbs and radiates heat).
Evaluate thermal performance during the mockup phase: install sample tiles in their intended locations, measure surface temperatures at peak solar exposure, and walk on them barefoot. If temperatures prove uncomfortable, adjust shading strategy, finish selection, or installation method before committing to full production. Area rugs and outdoor furniture can also mitigate hot zones for specific-use areas.
Procurement, Lot-Matching & Mockup Protocols
Natural stone varies from quarry run to quarry run, and even within a single lot, color and veining shift subtly. To achieve visual continuity across a large indoor-outdoor installation, reserve specific production lots at the time of order and request pre-shipment verification.
Include this language in your purchase order: “Supplier shall reserve sufficient material from a single production lot to complete the project scope, including 10% overage for cuts and future repairs. Supplier shall provide lot identification tags and high-resolution photographs of representative tiles from the reserved lot before shipment. No substitution of lots is permitted without written approval following review of new lot samples.”
Request sample panels drawn from the reserved lot—typically 16 to 20 tiles representing the full range of color and pattern variation. Install these samples on site as a mockup spanning at least 6×6 feet and including a threshold transition if applicable. The mockup serves as the acceptance standard: all subsequent shipments must match the approved mockup in color range, finish quality, and dimensional consistency.
Specify mockup acceptance criteria: review under natural daylight, verify joint widths and lippage limits, photograph the approved mockup from multiple angles, and document any acceptable variation. Require the installer and owner to sign off on the mockup before production material ships. Include PO language for holdback: “10% of contract value held until final installation matches approved mockup and all punchlist items are complete.”
For submittals, require: product data sheets with physical properties (absorption, flexural strength, frost resistance if applicable), lot identification numbers, certification of origin, and photographs of the reserved lot. Maintain a sample tile from the approved lot on site throughout construction for reference during receiving and installation.
Maintenance & Long-Term Care for Continuous Limestone Floors
Limestone is a calcium-based stone, reactive to acids and susceptible to staining without proper sealing. For continuous indoor-outdoor installations, apply a penetrating sealer (impregnator) after installation and grout curing. Penetrating sealers soak into the stone’s pore structure, repelling water and oil-based stains without altering surface appearance. Topical sealers form a surface film, providing stronger stain resistance but requiring more frequent reapplication and potentially creating a “wet look” that may not suit the desired aesthetic.
Apply sealer to both interior and exterior zones, following manufacturer instructions for coverage rate and cure time. Typical recoat intervals range from 1 to 3 years for interiors and 6 months to 2 years for exteriors (example estimates—consult product TDS), depending on traffic, exposure, and sealer type.
Desert dust is the primary maintenance challenge. Establish a cleaning regimen: dry-sweep or vacuum daily to remove grit, damp-mop weekly with pH-neutral stone cleaner diluted per label instructions, and avoid acidic or abrasive cleaners that etch limestone or strip sealers. Citrus-based, vinegar-based, and bleach-based cleaners are incompatible with limestone; choose products specifically labeled for natural stone.
Inspect exterior limestone quarterly for sealer integrity, grout deterioration, and joint sealant failure. Re-seal high-traffic and high-exposure areas as needed. Check perimeter joints and threshold sealants annually and refresh as necessary to maintain weather-tightness and prevent water infiltration that could lead to efflorescence or substrate damage.
For stain removal, address spills immediately by blotting (not wiping) and cleaning with stone-safe cleaner. Persistent stains may require poulticing—a process best performed by a professional stone restoration technician.
Accessibility, Thresholds & Door Systems
Flush thresholds that meet ADA accessibility guidelines (maximum 1/2-inch vertical change, beveled if greater than 1/4 inch) require careful coordination among architect, tile installer, and door supplier. The goal is a continuous floor plane interrupted only by a weather seal, with no projecting sill or raised threshold.
Begin by selecting door systems designed for minimal threshold profiles. Sliding and lift-slide door systems can achieve near-zero thresholds when paired with recessed low-profile track systems. Pivot doors offer a clean aesthetic but may require custom threshold fabrication to house pivot hardware while maintaining floor continuity.
Door sill details must integrate weather-tightness without sacrificing the seamless look. Recessed sill pans capture water infiltration and direct it to weep holes or exterior drainage; these pans sit below finish floor level and are concealed by the tile. Compression seals at the door bottom engage the tile surface directly, requiring tight flatness tolerances and durable stone that won’t abrade or fracture under repeated door operation.
Low-profile linear drains positioned just outside the door line provide a second line of defense, intercepting water before it reaches the threshold. These drains can be recessed into the paving plane or integrated into the joint between the last interior tile and the first exterior tile, maintaining visual continuity while managing moisture.
For projects in Prescott and Flagstaff, where freeze-thaw cycles occur, ensure threshold details include insulation and thermal breaks to prevent cold bridging and condensation at the door sill. Verify that adhesives, sealants, and grouts are rated for freeze-thaw resistance.
Consult a building-envelope professional to review threshold assemblies for water-tightness, air infiltration, and structural adequacy. Even small details—gasket compression, weep hole sizing, flashing laps—determine long-term performance and the success of the seamless aesthetic.
Extra-Large Tile Handling, Site Logistics & Installation Risk Management
Large-format limestone tiles—particularly those measuring 48×48 inches or 60×60 inches—are heavy, fragile during handling, and costly to replace. A single 48×48-inch tile at 20mm thickness can weigh 80 to 100 pounds (estimate). Mishandling during delivery, storage, or installation introduces risk of chipping, cracking, or breaking.
Upon delivery, inspect all pallets before the truck leaves the site. Verify pallet tags against the purchase order: check lot numbers, piece counts, and dimensions. Visually inspect the top layer of each pallet for cracks, chips, or color mismatches. Photograph any damage immediately and notify the supplier before unloading. Shortages or defects discovered after the truck departs complicate claims and delay the project.
Store pallets in a shaded, weather-protected area, elevated on blocking to prevent ground moisture absorption. In Phoenix and other low-desert cities, avoid exposing pallets to direct summer sun; surface temperatures on dark-colored pallets can exceed 150°F, potentially causing adhesive tape failure, packaging degradation, or even stone thermal stress (though the latter is rare). Schedule deliveries for early morning—before 8:00 AM—during June, July, and August to allow unloading in cooler conditions.
Handling large-format tiles requires a minimum two-person team and, ideally, mechanical assistance. Use suction-cup lifters rated for the tile weight and size; these devices distribute load evenly and minimize edge stress. Carry tiles on edge, never flat, to reduce flexural load on the stone. Establish a clean, flat laydown area near the installation zone to minimize transport distance and handling cycles.
Quality assurance during installation includes dry-laying tiles to verify pattern, color flow, and joint alignment before applying mortar. Mix adhesive in small batches to maintain open time, back-butter large tiles to ensure full coverage, and use a notched trowel sized appropriately for the tile format (typically 12mm × 12mm or larger for 48-inch tiles). Check lippage continuously with a straightedge and adjust with lippage-control systems.
For high-value projects, consider purchasing 5% to 10% overage beyond the standard 10% to accommodate breakage, future repairs, and field cuts at complex details. Store this overage indoors for the life of the warranty period.
City-by-City Best Practices
Phoenix
Phoenix’s extreme summer heat—daytime highs regularly exceed 110°F—demands installation scheduling that avoids midday work. Mortar and grout can flash-set in minutes under direct sun, compromising bond strength and workability. Plan tile installation for early morning or late afternoon, and shade the work area with tarps or temporary structures. Night-ventilation strategies—opening the building envelope after sunset—help dissipate stored heat in newly installed limestone floors, accelerating cure and improving comfort.
Installer/Supplier Instruction: Request that all Phoenix deliveries arrive before 7:00 AM during May through September, and confirm the installer’s plan for shading the work zone and maintaining mortar temperature below 90°F during application.
Tucson
Tucson shares Phoenix’s heat but receives slightly more monsoon moisture, increasing the importance of drainage design and sealer application. Ensure exterior limestone slopes uniformly away from the building, and verify that threshold drains are clear and functional before the summer rainy season. Tucson’s dust storms can deposit fine alkaline particulates that etch unsealed limestone; prioritize sealer application within 48 hours of grout curing.
Installer/Supplier Instruction: Specify that the installer apply penetrating sealer to all exterior limestone within two days of final grout cure, and provide written confirmation of sealer product name, coverage rate, and application date for warranty records.
Scottsdale
Scottsdale’s design expectations lean contemporary and high-end, with clients often requesting bookmatched limestone slabs or custom edge profiles. Coordinate early with fabricators to ensure large-format tiles are cut from sequential slabs for pattern continuity. Scottsdale’s building departments may require enhanced energy compliance for large glazed openings; confirm that continuous limestone floors contribute to thermal mass credits under the energy code.
Installer/Supplier Instruction: Request pre-shipment photographs showing the sequence of slabs from which your tiles are cut, and ask the supplier to mark slab numbers on each tile back to enable bookmatching during installation.
Mesa
Mesa’s more affordable housing stock makes cost control important. Large-format limestone can be value-engineered by reducing tile size to 24×36 inches or 36×36 inches—still larger than standard modular tiles—which decreases waste factor and handling labor. Mesa’s flatter topography simplifies drainage design, but the region’s caliche-rich soils may require additional substrate stabilization if building on native grade.
Installer/Supplier Instruction: Ask your supplier to provide a detailed waste-factor estimate for your specific layout, including cuts at edges and penetrations, and request pricing for both 48×48-inch and 36×36-inch formats to compare installed cost per square foot.
Chandler
Chandler’s newer master-planned communities often feature HOA architectural guidelines that restrict exterior material palettes. Verify that your selected limestone color and finish comply with community design standards before ordering. Chandler’s mix of established and new construction means substrate conditions vary widely; older slabs may exhibit cracking or settlement requiring crack-isolation membranes, while new slabs may still be curing and off-gassing moisture.
Installer/Supplier Instruction: Provide the installer with a copy of your HOA’s exterior material approval letter, and request that the installer perform a calcium-chloride moisture test on the slab before tile installation to confirm the substrate is sufficiently dry (typically below 3 pounds per 1,000 square feet per 24 hours for cementitious adhesives).
Gilbert
Gilbert’s rapid growth and family-oriented demographic favor durable, low-maintenance installations. Large-format limestone delivers both, but homeowners should understand the maintenance commitment. Emphasize sealer reapplication intervals and cleaning protocols during the design phase. Gilbert’s building activity often means nearby construction dust; protect newly installed limestone with breathable floor coverings until adjacent trades complete work.
Installer/Supplier Instruction: Request a written maintenance guide from the installer at project completion, including sealer product name, recoat intervals, recommended cleaners, and a schedule for the first year’s maintenance tasks.
Prescott
Prescott’s high-elevation climate (mile-high) introduces freeze-thaw cycles absent in the low desert. Specify frost-resistant limestone (water absorption below 0.5% per ASTM C97) and adhesives rated for exterior freeze-thaw exposure. Joint sealants and grouts must remain flexible at temperatures below freezing to prevent cracking. Prescott’s pine-forested setting increases organic debris; consider slightly textured finishes to hide pine needles and improve traction on potentially icy winter mornings.
Installer/Supplier Instruction: Confirm in writing that the limestone lot provided has been tested for freeze-thaw resistance per ASTM C1026 or equivalent, and request certification that all adhesives, grouts, and sealants used are rated for freeze-thaw exposure (note: verify current freeze-thaw test standards with supplier as ASTM standards evolve).
Flagstaff
Flagstaff’s high elevation (7,000 feet) and significant snowfall demand the most robust installation systems in the state. Expect 100+ inches of snow annually and winter lows below 0°F. Direct-bond exterior limestone installations are feasible but require heated slab systems or pedestal installations that isolate the paving plane from freeze-thaw substrate movement. Radiant floor heating beneath interior limestone extends comfort and helps dry exterior zones near thresholds. Flagstaff’s building codes may require enhanced insulation and thermal performance; confirm that continuous limestone floors do not create cold-bridging or condensation issues.
Installer/Supplier Instruction: Request that the supplier provide freeze-thaw test data for the specific limestone lot (ASTM C1026 or equivalent), showing zero weight loss and no visible deterioration after 15 freeze-thaw cycles (unverified standard as of November 2025—confirm current industry requirements), and ensure the installer specifies a heated-slab detail or pedestal system for all exterior zones.
Design Examples & Layout Strategies
Effective layout amplifies the seamless aesthetic. Run large-format tiles perpendicular to the primary sightline—from foyer through threshold to patio—so the long dimension draws the eye outward and emphasizes continuity. Avoid centering a grout joint on the door opening; instead, position a full tile or a symmetrical tile pair at the threshold centerline for a balanced, intentional look.
Bookmatching—arranging tiles cut from sequential slabs so veining patterns mirror across a joint—creates dramatic visual impact at prominent thresholds. This technique requires advance coordination with the supplier to reserve sequential slabs and careful on-site layout to maintain the intended sequence. Bookmatching works best with tiles larger than 36×48 inches where veining is visible and impactful.
Experiment with bond patterns: a running bond (offset joint pattern) introduces subtle directionality, while a grid pattern (aligned joints) maximizes the minimalist aesthetic. For indoor-outdoor continuity, maintain the same bond pattern on both sides of the threshold. Alternating bond patterns interior to exterior can work if the change aligns precisely with a strong architectural element—a beam line, a material change in the door frame—that justifies the pattern shift.
Minimize cuts by coordinating tile module with room dimensions early in design. A 48×48-inch tile module subdivides easily into 24-inch, 16-inch, and 12-inch increments, allowing efficient layout with minimal waste. Align grout lines with cabinetry edges, door jambs, and other fixed elements to create a cohesive, measured appearance.
Schematic example: In a 20-foot-wide great room opening onto a 16-foot-deep patio, lay five 48-inch tiles across the width (20 feet = 240 inches / 48 = 5 tiles exactly) and continue the same grid outdoors. This creates zero waste at the primary dimension and establishes a strong visual rhythm that unifies the spaces.
Cost & Value: Budgeting for Extra-Large Limestone Tiles
Large-format limestone commands premium pricing, but the investment delivers measurable value in aesthetics, longevity, and reduced maintenance. Cost drivers include tile size (larger formats cost more per square foot), lot reservation fees, specialized handling equipment, skilled installation labor, and mockup expenses.
Material costs for large-format limestone suitable for Arizona indoor-outdoor applications typically range from $12 to $35 per square foot (estimate, material only, excluding freight and installation). Budget an additional 10% to 15% for waste factor; large-format tiles generate more waste at cuts and edges because fractional tiles are harder to reuse. Lot reservation may add 5% to 10% to material cost but guarantees color consistency and avoids costly delays waiting for suitable replacement lots.
Installation labor for large-format stone runs $10 to $20 per square foot (estimate), higher than standard tile due to the need for flatter substrates, lippage-control systems, specialized lifting equipment, and slower installation pace. Factor in substrate preparation (grinding high spots, filling low areas, installing crack-isolation membranes) at $2 to $5 per square foot (estimate). Mockup costs—typically a flat fee of $500 to $2,000 depending on mockup size and complexity—should be included in the project budget.
Potential savings arise from reduced grout joint material and labor (fewer linear feet of joints to fill), faster covering of large areas (once substrate is prepped), and reduced future maintenance due to fewer joints that trap dirt and require periodic sealing.
Plain-text budgeting example (estimate for a 12×12-foot threshold zone spanning interior and exterior, 144 SF total):
| Item | Unit | Quantity | Rate (Est.) | Subtotal (Est.) |
|---|---|---|---|---|
| Limestone tile (48×48) | SF | 160 (incl. 10% waste) | $25.00 | $4,000 |
| Freight | LS | 1 | $300.00 | $300 |
| Substrate prep | SF | 144 | $3.50 | $504 |
| Installation labor | SF | 144 | $15.00 | $2,160 |
| Mortar, grout, sealer | LS | 1 | $350.00 | $350 |
| Mockup (allocated) | LS | 1 | $200.00 | $200 |
| Total (Estimate) | $7,514 |
Note: All figures are estimates for planning purposes. Request detailed quotes from local suppliers and installers; actual costs vary by material selection, site conditions, and regional labor rates.
The value proposition improves over time: a well-executed large-format limestone installation can last decades with minimal maintenance, avoiding replacement costs and preserving the seamless indoor-outdoor aesthetic that defines the home’s character and resale appeal.
Our tile craftsmanship throughout Arizona
This hypothetical, specification-focused briefing describes how large-format limestone tiles could be used to create seamless indoor-to-outdoor living in Arizona. It explains key material and detailing choices driven by local climate and performance goals, and it suggests procurement and mock-up steps a supplier such as Citadel Stone could provide to help architects and builders evaluate options for each city listed below. All recommendations are conditional and intended to inform specification and coordination rather than to describe completed work.
Phoenix
For Phoenix projects we would prioritize limestones that tolerate intense solar gain, persistent fine dust and elevated daytime temperatures while remaining comfortable underfoot. Large-format tiles can reduce joints and visual breaks, but selection should favor low-porosity material and honed or fine-textured finishes to limit dust adhesion and glare. Where indoor floors continue outdoors, we would recommend 10–20 mm (≈3/8–3/4 in) for interiors and 20–30 mm (≈3/4–1 1/4 in) for exterior paving or thresholds; consider mortar-bed or thinset that maintains thermal contact so the tile’s mass contributes to comfort. Citadel Stone could be asked to provide large panel samples, slip-resistance guidance and mock-ups to assess color and joint strategies.
Tucson
In Tucson we would account for strong solar radiation, significant diurnal swings and seasonal dust storms when specifying large-format limestone. Dense stone and honed or brushed finishes are usually recommended to balance barefoot comfort with cleanability; slightly textured surfaces can retain adequate slip resistance when wet. For flush indoor-outdoor transitions we would recommend 10–20 mm (≈3/8–3/4 in) interior tile and 20–30 mm (≈3/4–1 1/4 in) exterior, with grout and joint details that allow for thermal movement. Citadel Stone could be asked to provide technical datasheets, sample panels and recommended installation notes for Tucson exposures.
Mesa
For Mesa applications we would suggest limestones that resist fine grit and tracked-in sand, and finishes that tolerate frequent sweeping and periodic wet cleaning. Large formats reduce cleaning effort but demand strict flatness tolerances and careful subfloor preparation; honed or very fine-textured faces are often recommended for continuity between living rooms and covered patios. Typical guidance is 10–20 mm (≈3/8–3/4 in) for interiors and 20–30 mm (≈3/4–1 1/4 in) for exterior transitions; consider slightly tighter joint widths and compatible sealants to limit particle ingress. Citadel Stone could be specified to supply sample layouts, recommended tolerances and palletised sample bundles for on-site mock-ups.
Chandler
In Chandler we would usually recommend material and detailing that accommodate irrigation-driven soiling from landscape beds and high use of outdoor living areas. Large-format limestone that is low-absorption and finished honed or brushed is typically advised to reduce staining risk and simplify maintenance. For indoor-outdoor continuity we would recommend 10–20 mm (≈3/8–3/4 in) interior tiles and 20–30 mm (≈3/4–1 1/4 in) exterior tiles with specified jointing that allows for thermal and moisture movement without differential heave. Citadel Stone could be asked to provide specification text, recommended sealers and sample mock-ups to test cleanability under local irrigation regimes.
Scottsdale
For Scottsdale luxury residences we would emphasize color consistency, refined finishes and a tactile surface that remains comfortable in direct sun. Large-format limestone that matches interior palettes and uses honed or very fine-textured finishes can unify indoor and outdoor spaces while limiting joint sightlines; low-porosity selections reduce staining and ease upkeep in dusty, high-sun exposures. Typical thickness guidance would be 10–20 mm (≈3/8–3/4 in) inside and 20–30 mm (≈3/4–1 1/4 in) for exterior terraces and pool perimeters. Citadel Stone could be requested for extended sample holds, finish comparison panels and CAD-ready jointing details to support aesthetic coordination.
Gilbert
In Gilbert we would recommend pragmatic specifications that balance repeatability and on-site resilience: limestones with tight grain, low absorption and honed or brushed finishes reduce embedded dust and simplify cleaning in busy family homes. Large-format tiles can reduce maintenance and create strong sightlines between interiors and covered patios; we would typically recommend 10–20 mm (≈3/8–3/4 in) for interiors and 20–30 mm (≈3/4–1 1/4 in) outdoors, plus a jointing strategy that tolerates thermal movement and occasional wetting. Citadel Stone could be asked to provide sample bundles, installation tolerances and mock-up support to verify the proposed seamless transition.
Conclusion & Designer/Owner Action Checklist
Creating a seamless indoor-outdoor living experience with large format limestone tiles Arizona homeowners and designers rely on requires coordination across design, procurement, installation, and maintenance phases. The visual continuity you achieve—a single, unbroken plane of natural stone connecting interior and exterior—transforms how a home feels and functions, blurring boundaries and expanding perceived space. Success depends on specifying the right material and format, engineering movement joints that prevent cracks, reserving color-matched lots, and executing installations with precision.
Designer/Owner Action Checklist:
- Reserve Specific Lots: Confirm with your supplier that all material ships from a single production lot; request lot identification tags and pre-shipment photographs.
- Install & Approve Mockup: Build a 6×6-foot (minimum) mockup spanning the threshold; review under natural daylight at multiple times of day; photograph and document acceptance criteria before production material ships.
- Align Joints Interior-to-Exterior: Coordinate control and expansion joint locations so interior and exterior patterns align visually; verify joint widths and sealant types with project engineer.
- Choose Climate-Appropriate Finish: Select honed or textured finishes for slip resistance and thermal comfort; avoid polished finishes outdoors; test surface temperature during mockup review.
- Plan Handling & Site Logistics: Schedule early-morning deliveries during summer months (Phoenix, Tucson, low-desert cities); provide shaded storage; confirm installer has suction lifters and adequate crew size for large-format tiles.
- Establish Maintenance Plan: Apply penetrating sealer after installation; document sealer product, application date, and recoat intervals; provide homeowner with stone-safe cleaning products and written maintenance schedule.
Request a detailed mockup and installation plan from your local stone supplier and experienced installer to bring your vision of seamless Arizona living to life.
Stabilize Your Indoor Temperatures with Limestone Tile Thermal Mass!